
There have been a number of really bad viruses just within the past 6 months. We've seen the W32.Beagle, W32.Netsky, MyDoom, and so on. Most of these viruses were transported or replicated from pc to pc-using email attachments. These are easy to spot if you're paying attention, simply because they are usually executable files, but not always.
Some attachments contain Macros (simple programs that run within other programs, all the titles in Microsoft Office use macros). If you're not that familiar with spotting file extensions, don't worry, that's what I'm here to talk about today. If you are a little hazy on the whole "file extension" thing then let's spend a few moments explaining it.
File extensions are what tell the program how to treat a particular piece of data. For example, most people are somewhat familiar with .doc or a .txt file extensions these are both text documents and when the user opens this file the Operating System looks at this extension and then knows how to open it.
Hackers try to use some sort of eye-grabbing ploy to get you to open their email and activate the virus, which is always an attachment. Most Anti-virus nowadays stops, or at least warns, you of these high risk attachments and even take measures to protect you. However, on the average 10-15 new viruses are created every day and I personally wouldn't count on any program to 100% protect my pc. That's why I scrutinize any email, if I wasn't expecting an attachment, I won't open it until I had a chance to talk to the sender.
Some of the more common file types used to hide viruses include:
- .scr - Windows Screen Saver - USE CAUTION if you receive a screen saver via email. They can contain worms or viruses
- .pif - DO NOT OPEN! This is most likely a virus. Clicking it will run a program or code that can mess up your computer.
- .exe - executable file - a program that contains a virus, Trojan horse, or worm
- .pps - MS PowerPoint (can contain macro virus)
- .zip - Zip (compressed) file
- .vbs - Visual Basic script
- .bat - Executable MS-DOS batch file
- .com - DOS executable command
- .asp - active server page - internet script
- .doc - Word document (can contain macro virus)
- .xls - Excel file (can contain macro virus)
This is in no way a complete list. Just because an attachment may have one of these extensions doesn't mean that it is a virus, but it should send up warning flags. Hackers use clever subject lines, and viruses can appear to come from a friend so keep on your toes and don't fall victim to their deceptive traps. Scan those attachments and verify with the sender before opening.

Trick to Stop or Disable the Ads in Youtube While Playing an Video.
It's Impossible to Stop the Ads in Youtube but You can Try the Alternate Method to Watch Videos without Ads and Enjoying the Online Video Sessions. A Firefox extension TubeStop was created to keep YouTube videos from automatically playing on the video-sharing site. A great side effect of TubeStop has been the removal of the new ads on YouTube clips.
How this will work : TubeStop replaces YouTube’s native player on the site with the embeddable version, which has not been ad-ified yet. So get the TubeStop extension now, and you’ll be prepared for when Google starts rolling ads on YouTube again.

Some times Some websites banned by Government, ISP and may be by your office network administrator.
This Tricks are very useful, if you are using internet particularly in school, college and office.
Follow any of the Below Tricks to Enable or to Access the Websites :
Trick 1: Search the banned website, for example www.example.com in Google and yahoo search engine then open the cached copy of that page to access the website. You can get also cache link of that website, if you search in Google with keyword cache:URL name and get cache link to access the website.
Trick 2: Another method to access the banned website using its IP address, because you can open the website with IP address instead of actual URL name. This Trick bypasses the URL based restrictions. For example if www.example.com is banned in your school, you can open it using IP address 216.178.32.51. You can search online IP conversion tools to get IP address of any website.
Trick 3: There are some mini web browsers can help you to open the banned websites, for example Opera Mini Browser, install it and try to open any banned website. Another Real Player browser can successfully help you to access the banned website. This Real Player browser bypasses the many restrictions of website banned tools.
Trick 4: There any many websites Anonymizer tools are available to fetch the banned website. These anonymous surfing tools that protect your identity on the internet and give the access to banned sites. As far as the service provider is concerned you are viewing a page from Anonymizer and not the blocked site.

Now You can insert the YouTube Videos into your PowerPoint slides to express your idea or better way to communicate something. You can convey these ideas in more effective ways, if you are using movie files with your simple slides.
Follow the given steps to add YouTube Videos into your PowerPoint slides:
First of all download the YouTube.com Videos and then save on your computer hard drive. Mostly movies are available in flash video file format on YouTube site.
You can convert also the downloaded Videos from YouTube into any common format, for example, windows media video file (wmv), windows video file (avi) and movie file (mpeg).
Tip : You can Use the KeepVid Program to Download the Youtube Videos.
First of all open the presentation in which you want to insert movie file.
Now click on "Movies and Sounds" option from the Insert" menu and choose the option "Movie from File".

Now select your movie that you want to insert into slide and click on Ok button.

Here now you are asked "Do you want your movie to play automatically in the slide show? If not, it will play when you click it."

Recommend choosing Ok button to play automatically even if you want the movie to play when clicked.
Finally save your PowerPoint presentation and run it for test.

Usually PC Users will end the Running tasks the Un-Responsive programs manually using windows Task Manager with (CTRL + ALT +DELETE) keys.
Sometimes these non-responsive programs creates problem to run windows and others programs properly.
You can configure your computer to manage these non-responsive programs automatically.
Windows has a feature that will close all non responding program automatically.
If you have little knowledge about editing windows registry then you can configure your computer for this purpose.
Follow the given steps to configure windows registry for auto end task:
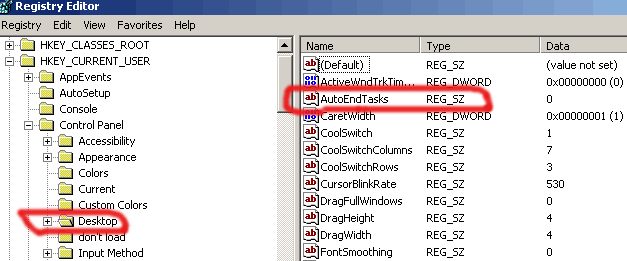
First click on Start button then type Regedit in Run option. Here locate the location to:
Go to Hkey_Current_User\Control Panel\Desktop
Here in right side panel, double click on AutoEndTasks and here its default value is 0. Now change it to 1. Now windows will close your all non-responsive programs automatically.
Finally Now Close All Running Programs in Your System and Re-Start Your System Once to See the Changes that you have Made.

Usually When you are working on your local computer and want to refresh any changes in your system automatically.
For example some times you are watching sports results, online Stock Exchange rates and any changes to your hard drive but these changes are not usually refreshed until you press the F5 key on your keyboard.
To refresh your screen automatically you should edit your system Registry.
But the best technique to edit the windows registry keys, always export or backup the whole windows registry keys on backup drive before editing.
Because if you do any mistake in Registry can cause serious problem in your computer to run properly.
Follow the below given steps to change the updates automatically.
- First click on Start button then type Regedit in Run option.
- In Registry Editor panel go to the path: HKEY_LOCAL_MACHINE / System / CurrentControlSet / Control / Update Mode
- Here in right hand side panel edit the DWORD value to be between 1 and 5.
- Now restart your computer after any changes to go into effect.

Microsoft Outlook enables you to filter and organize e-mail messages, integrate and manage e-mail from multiple e-mail accounts, personal and group calendars, contacts, folders, and tasks.
Outlook data is usually stored at the following paths be defaults but you can change Outlook location.
Normally Outlook folder location is C:\ drive when you install your window on C drive, but you can change location of you Outlook to other Drive.
- C:\Documents and Settings\User Name\Application Data\Microsoft\Outlook\
- C:\Documents and Settings\User Name\Local Settings\Application Data\Microsoft\Outlook\
- C:\Documents and Settings\All Users\Application Data\Microsoft\Outlook\
- C:\Windows\Application Data\Microsoft\Outlook\
- C:\Windows\
Usually Using Import and Export feature in Outlook, you can create the full backup of outlook contacts. Because without backup yon can lose your e-mail accounts data any time due to virus, power failure and hard disk problem.
Follow the given steps to export your outlook contacts to Excel file:
Click on Start button, go to Program then click on Microsoft Outlook to export the contacts.
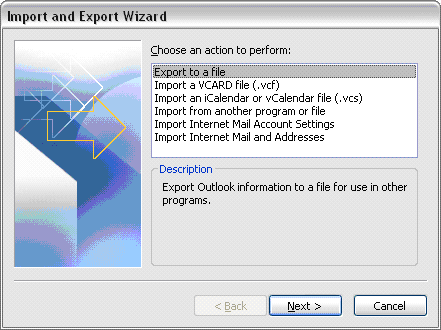
Now go to File menu and click on Import and Export option. Choose Export to a file as show in the below figure then click Next.
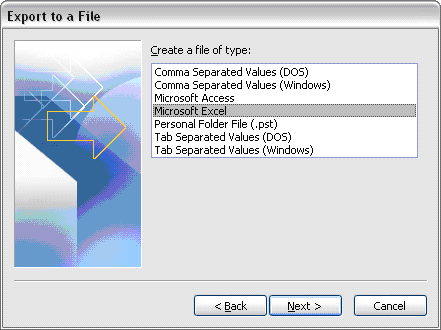
Now on next dialog box, choose Microsoft Excel and click Next.
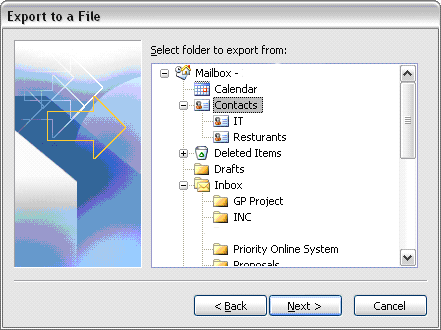
Select the Contacts Folder you want to backup to Excel file as shown below then click Next.
Choose a name and location where to save the Excel file by clicking Browse button, then click Next.
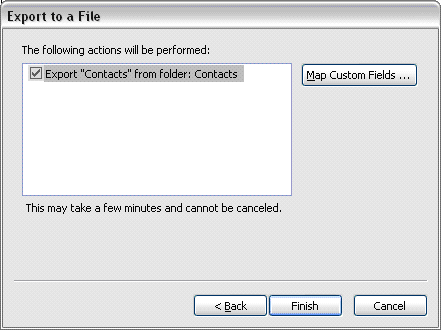
Click Finish to start the back up procedure which may take little time depending on how many contacts you have.

Follow the Steps Below to Take the Entire System Backup Regularly to Keep Your Files Safe!
Back up regularly your data : It is important factor for you to get backup your files and folder on a regular basis. Because in this global network a computer can crash, a virus, or a hard drive failure can wipe out everything. Don't make this mistake, It depend upon you and your data importance but better technique is that back up everything at least once a week. But if you use your computer daily, it is best to back up important files daily and other data weekly.
Keep several backup copies of same backup : Never back up over a previous backup copy, always try to keep several copies over time so that if one time one back create problem you can user others.. Remember, a problem that is backed up will remain a problem when restored!
Easy way for backup using Be selective method : You don't have to do a total system backup of your system over time, If your are doing so, you are wasting your time. Just back up your important files, folder and photos. Backing up the entire hard drive is time-consuming, not practical, and should not be done. A backup of specific data files is the way to go. But a best technique is that first install your all computer program and system drivers then do a backup using any third party software (cloning software) like Norton ghost or others of your C drive once, this backup will help you to restore your all computer program in 15 min in case of any problem and do important data backup daily or weekly.
You can shutdown your computer with a single click on the desktop shutdown icon. You can set the time when your computer starts the shutdown process. A simple click on shutdown icon, close the all running applications and start shutting down properly after predefined time. This tip is very useful to save energy and time. After the execution of this command, a small window will appear to start count time of system shutdown.
Follow the given steps to create the shutdown icon:
To create a new shortcut, right click on any empty area of your desktop and go to New then Shortcut.


Follow the given steps to create the shutdown icon:
To create a new shortcut, right click on any empty area of your desktop and go to New then Shortcut.
Now a small windows dialog box will appear with the title “Create Windows”. In the “Create Shortcut” window, type the following command.
SHUTDOWN -s -t 30
Here t 30 mean time in second, for example if you want your computer will shutdown automatically after half minute then the command will be shutdown -s -t 30.
Click Next button to type the name of this shortcut and press Finish to close it.
At the end, when you click on shutdown icon, a windows dialog box will appear with the information” This system is shutting down. Please save all work in progress and log off. Any unsaved changes will be lost. This shutdown was initiated by administrator”.
And the Final Preview Would be Look Like This :
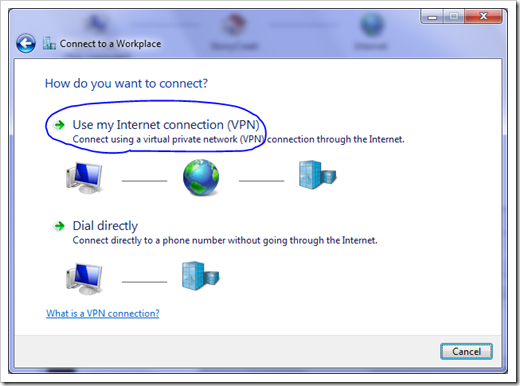
This Below Tutorial will help to Connect Virtual Private Network in Windows Operating System :
- Open the Network Connections option in Control Panel. A list of existing dial-up and LAN connections will appear.
- Choose the 'Create a new connection' option from the left-hand side of the window. First click Next to begin the wizard, then choose the 'Connect to the network at my workplace' item from the list and click Next.
- On the Network Connection page of the wizard, choose the 'Virtual Private Network connection' option and click Next.
- Here type a name for the new VPN connection in the 'Company Name' field and click Next.
- Choose an option on the 'Public Network' screen and click Next. The default option, 'Automatically dial this initial connection' can be used if the VPN connection will always be initiated when the computer is not already connected to the Internet. Otherwise, choose the 'Do not dial the initial connection' option. This option requires that the public Internet connection be established first, before this new VPN connection will be initiated.
- Enter the IP address of the VPN remote access server to connect to, and click Next.
- Choose an option on the "Connection Availability" screen and click Next. The default option, 'My Use Only,' ensures that Windows will make this new connection available only to the currently logged on user. Otherwise, choose the 'Anyone's use' option.
- And the Final Step Click Finish to complete the wizard.
Microsoft Word 2010 gives the ability to create large documents. One often needs to edit and manage the document before it is finally finished. Rearrangement (of slides) in PowerPoint is rather easy, as one just needs to drag and rearrange the thumbnails for the slides.
In some cases one might need to reorder pages in a large document. In this step-by-step tutorial we shall describe how you can reorder your pages in a Word document, as there is no function (similar to that in PowerPoint) that allows you to drag pages around the screen.
What Will You Need?
Microsoft Word 2010
Step 1: Open Microsoft Word 2010.
Step 2: Open the document in which you wish to reorder the pages. Scroll down to the page that you wish to move. We are going to use a Test Document for this tutorial. It consists of 4 pages.
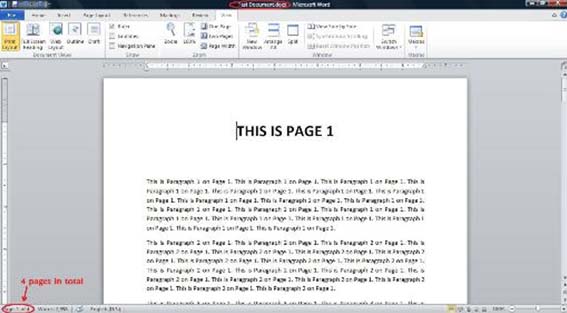
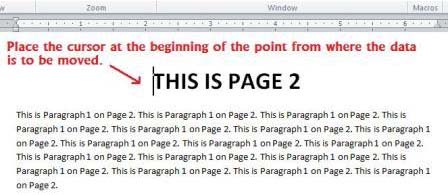
Place the cursor right at the beginning of the text, from the point where you would like the data to be moved.
Hold the "Shift" key and then press the "Page Down" button on your keyboard. The text on the page should be selected now. If all the text that you wanted to select did not get included in the selection, then keep holding the “Shift” key and press the down arrow key on your keyboard to select the additional lines that you want to include.Similarly, if some extra text has been included, then keep holding the “Shift” key and press the up arrow key to deselect the lines that you wish to exclude from the selection. The highlighted area shows the text that you have selected. Once you have selected the text that you want to move, release the “Shift” key.

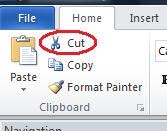
Step 3: Once you have selected the text that you want to move, press and hold the “CTRL” key and press “x” to cut your selection. The other way to cut the selected text is to click on the “Cut” button in the Clipboard box in the Home tab.
Step 4: Scroll over to the area where you want to paste the text. Make sure you keep the cursor right at the area where you want the text to fit in.
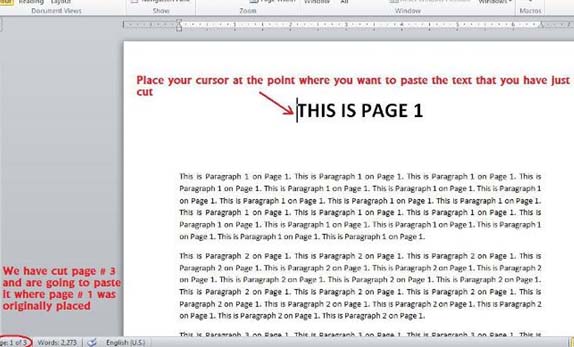
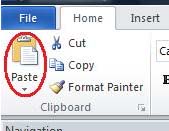
Once you’ve positioned the cursor where you want to place the text, hold down the “CTRL” key and press “v” to paste the text at the desired position. Or you can also position the cursor and then click on the “Paste” button in the Clipboard box in the Home tab.
Finally You have now successfully moved the contents from one part of your document to another.

When you Start using Windows 7, you find out that a few of the good Windows applications are not there. It is very easy to take care of that. You can install Windows Live Essentials in Windows 7 and so get your desired Microsoft applications in your computer. You should install Windows Live Essentials in Windows 7 as Microsoft has not added a number of former applications e.g. Photo Gallery, Messenger and Mail in Windows 7. Jointly called the Windows Live Essentials, the group consists of Family Safety, toolbar, Writer, Mail, Movie Maker, Photo Gallery and Messenger. This group of applications is now accessible by a simple additional download. Microsoft has done this in order to renovate as well as make progress in those features and not disturbing the foundation of Windows 7.
To install Windows Live Essentials in Windows 7 and thus get the Microsoft applications, you have to follow these steps:
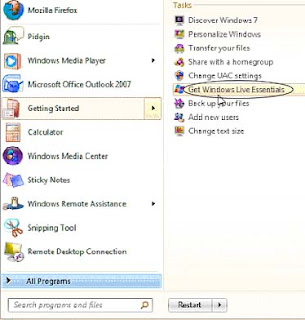
Click on the Start button.
Go to Getting Started in the Start Menu.
Choose Get Windows Live Essentials.
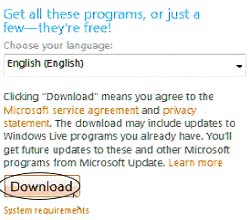
The Windows Live page will appear. Choose your language and click on the Download button.
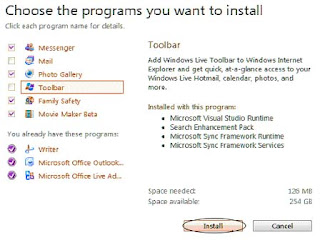
Check the boxes of the MS programs you want to install. These include Movie Maker, Photo Gallery, Mail and Messenger. Additional feature of Family Safety as well as a Toolbar can also be installed.
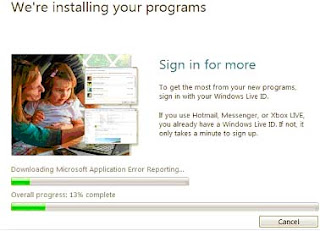
You will see this progress screen as the selections are being installed. It will take time according to the number of programs you have selected.
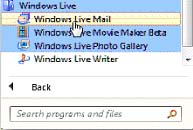
You can find the installed programs in the Start menu under Windows Live.
When you install Windows Live Essentials in Windows 7, you will as well get an extensive variety of additional components associated with the key applications. The users will find out that the Essentials installer will furthermore install .NET Framework, Microsoft Sync Framework Services, Microsoft Sync Framework Runtime, Search Enhancement Pack, Windows Live Sync, Direct3D 9, Microsoft Application Error Reporting etc.

Usually Sometimes happens different error codes in Internet Browsing. If you know the Error Occured and if you Know the Solution for that it is OK, but if you don't know, Here are the Reason Codes.
Below are the Error Codes and the Reasons for that Codes :
- 400 - This is bad request error, First check you may be typing wrong URL name and server could not understand your request.
- 401 - You are trying to open any unauthorized access site or page. Check your username and password if you are trying to open any webpage.
- 402 - Payment Required Error
- 403 - You are trying to open any forbidden page and you are blocked by that domain.
- 404 - Here you are trying to open the webpage that was removed or re-named, also check the URL spelling.
- 408 - This is time out error. you should send the request with in time that the server set for you.
This article will teach you explain to you how you can convert your Power Point 2010 presentation to a video, using below steps.
It is useful to convert your PowerPoint presentations to video because this way more people will be able to view it as it will allow without PowerPoint software to watch it as a video.
Follow these 7 steps:
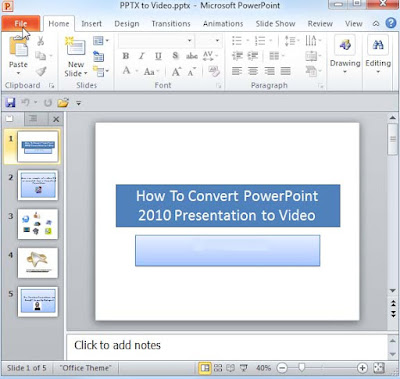
1. The first thing that you need to do is, select Backstage View from the File drop down menu.
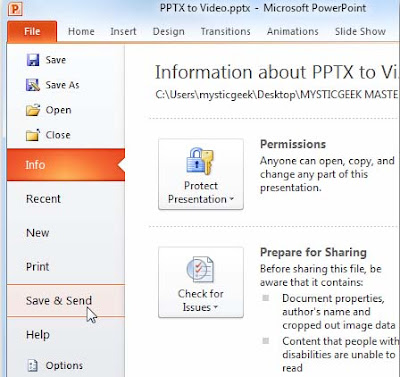
2. After you have opened the Backstage View, press the Select and Send option.
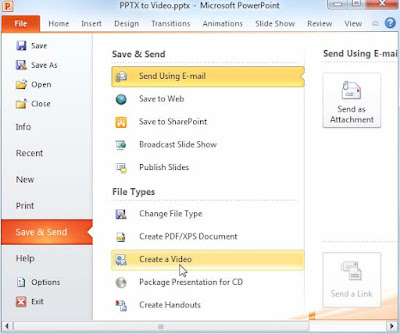
3. Once you have pressed the Send &Save button a number of options will be displayed in the File Types menu, select Create a video.
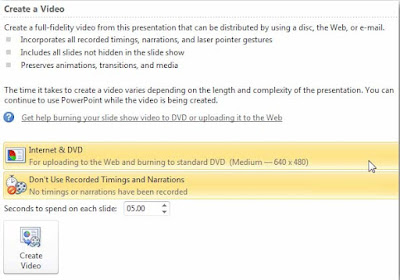
4. Once you have chosen to create the video, you need to select some other options such as the size of the file, recorded narrations and set the number of minutes which should elapse between slides and then press the Create a Video option.
5. Now that you have accommodated the view to your liking, all you have to do is designate a location for your video. In a corporate situation, it is always better to put it on a shared network drive.
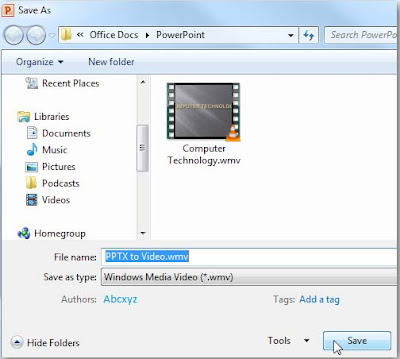
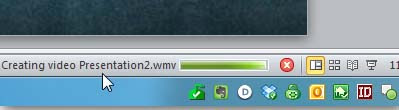
6. Now, that you have saved your video in your desired location, your file will start converting to the .wmv format. A progress bar will appear in the lower right corner of the PowerPoint presentation.
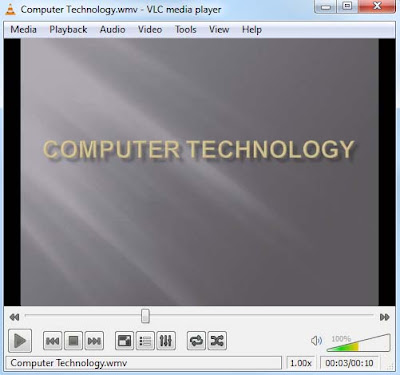
7. As all of the steps have been completed just turn on your .wmv compatible player and view your video.
Other options to add to your PowerPoint presentation are adding transitions to slideshows and animating text and objects . If you edit your video via Windows Live Movie Maker you can upload it to YouTube.
Converting your PowerPoint presentation not only makes your presentations more accessible but it also allows you to watch your video in your desired .wmv player.

Most people, dropping a CD into their disc drive and clicking "Import" in iTunes is good enough. For music freaks, though, it's not—and with good reason. Here's how to digitize your tunes, the right way.
First off, some reasons to take this road: iTunes is a decent audio encoder, and it'll get your music from point A—the CD—to points B, C and D—your computer, your MP3 player and your backup drive—without much trouble. But it'll do it with a less-than-great encoder, with occasionally inconsistent tagging, with album art that'll only work on Apple devices, and without support for the best lossless audio formats and MP3 encoding options, which you probably want, whether you know it or not.
In short, the ripping process deserves a little more care than iTunes or Windows Media player can give it. You can pay people for this, which feels dumb and wasteful, or you can do it yourself. It's not difficult, at all.
Below are the Some Steps that i will Refer you to Follow :

The first step to ditching iTunes is to, well, ditch iTunes. What we're looking for is ripping software that offers more encoding options than iTunes, but more importantly, a better encoder. And as far as MP3 encoders go, the open source LAME is as good as they get. There's plenty of software for both Mac and PC that leverages this encoder, but here are two programs that do lots, lots more.
Mac OS X: Max
When extracting audio from compact discs, Max offers the maximum in flexibility to ensure the true sound of your CD is faithfully extracted. For pristine discs, Max offers a high-speed ripper with no error correction. For damaged discs, Max can either use its built-in comparison ripper (for drives that cache audio) or the error-correcting power of cdparanoia.What this translates to: Great error reduction, fantastic sound quality, and tons and tons of encoding options—not that you really need those to do a good rip, but hey, they can't hurt. On top of all this, Max is also a great file converter, in case you've got some delinquent WMA files scattered around.
Windows: Exact Audio Copy
Exact Audio Copy is a so called audio grabber for audio CDs using standard CD and DVD-ROM drives. The main differences between EAC and most other audio grabbers areWhat this translates to: The best error correction money can buy, for free. Seriously: Audiophiles swear by exact audio copy, and with good reason. You'll have to download your own LAME encoder before you can enable MP3 encoding in the program options, but you can do that right here without a problem. Additionally, setting up tagging, which you'll definitely want to do, takes an extra, albeit easy, step.
• It is free (for non-commercial purposes)
• It works with a technology, which reads audio CDs almost perfectly. If there are any errors that can't be corrected, it will tell you on which time position the (possible) distortion occurred, so you could easily control it with e.g. the media player
If you want to take a simpler route you can just download CDex, which supports LAME and tagging databases out of the box, and produces results nearly as good as—if not as good as—Exact Audio Copy.
Now Choose Your File Type :
MP3: If you're encoding only for portable devices, not concerned about archiving perfect copies of your music, hate hate hate audiophiles, think FLAC and OGG just sound like gurgling baby noises, you're probably going to want to stick with MP3s. Yes, there are other formats that offer a better size-to-sound ratio, and no, it's not open source or anything, but for pure compatibility, control, and encoder choice, it's hard—-no, impossible—to beat MP3. And if you set up your encoder correctly, MP3s can sound great.
It's tough to pick the optimal MP3 bitrate on your own, since at a certain point, differences in sound quality seem to come down as much to psychological factors as to actual clarity. Thankfully, we've crowd-sourced this issue and come up with a rough guide: 256kbps is, it seems, where people just can't really tell the difference. In practical terms, this means setting your encoder to these settings:

That's no higher than 256kbps VBR—for variable bitrate, which modifies the amount of information in your file's stream according to how much is needed, and saves you space without sacrificing quality—with the highest (read: slowest) available encoding option. For almost everyone, in almost all circumstances, this'll do, and it sure beats iTunes default 160kbps constant bitrate rips.
FLAC: If archiving is your intention—as in, digitizing your music without losing any quality, no matter how imperceptible—then you're going to want to go lossless. And of the lossless formats, FLAC is the most well-supported in terms of software and hardware, albeit not on any of Apple's products—though iTunes can be made to play nice with FLAC with a few simple tweaks.
But don't fret! The beauty of FLAC music is that it can be converted to other lossless formats, like Apple's iPod-compatible Apple Lossless, without losing any quality, or compressed into MP3s without having to worry about muddy transcoding. Think of them as CDs without the physical disc, basically.

That's no higher than 256kbps VBR—for variable bitrate, which modifies the amount of information in your file's stream according to how much is needed, and saves you space without sacrificing quality—with the highest (read: slowest) available encoding option. For almost everyone, in almost all circumstances, this'll do, and it sure beats iTunes default 160kbps constant bitrate rips.
FLAC: If archiving is your intention—as in, digitizing your music without losing any quality, no matter how imperceptible—then you're going to want to go lossless. And of the lossless formats, FLAC is the most well-supported in terms of software and hardware, albeit not on any of Apple's products—though iTunes can be made to play nice with FLAC with a few simple tweaks.
But don't fret! The beauty of FLAC music is that it can be converted to other lossless formats, like Apple's iPod-compatible Apple Lossless, without losing any quality, or compressed into MP3s without having to worry about muddy transcoding. Think of them as CDs without the physical disc, basically.
Now Embed Your Album Art :

This is something else that iTunes doesn't do right: album art. Sure, it'll find it, but when you transfer all your music to a non-iPod music player, your art is gone. Why? It's because iTunes stores the album art in a separate database, rather than in the song file's ID3 tags, where it should be.
On Mac OS, assuming you're doing your listening in iTunes, which is pretty handy at fetching album art, you can just use one of Doug's famous iTunes scripts to write said album art directly to your MP3 files. Here's how you install it:For Windows users, Lifehacker's written a fantastic guide to collecting and embedding album art, which you should definitely read. The short version? Download MediaMonkey, and let it do the work for you.
Granted, once you embed album art into your files, apps like iTunes and Windows Media Player might not display it, and may ask you to search for it from their databases. This is fine: Both programs use proprietary album art storage systems, so just because they can't see your ID3 tag album art doesn't mean it's not there, or that you shouldn't have embedded it—having it around can't hurt, and it's by far the most compatible and rational method for storing album art, as far as other software, most MP3 players and long-term storage go.