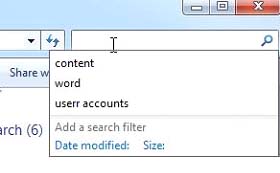
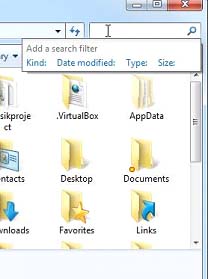
Windows 7 automatically saves all the recent searches done by the users. Some people are annoyed by this feature as the last three searches become visible under the search box as you start typing in it. If the computer is shared by others, you might not want others to see your past searches. There is a way in which you can disable search history display in Windows 7. However, you cannot disable search history display in Windows 7 Home editions. This is due to the fact that you need to utilize the Group Policy Editor for achieving this goal and it is not available in the Home versions.
Follow these steps to disable search history display in Windows 7:
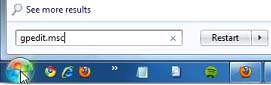
- Enter gpedit.msc in the search box of the Start menu. Press Enter. This will open the Local Group Policy Editor.
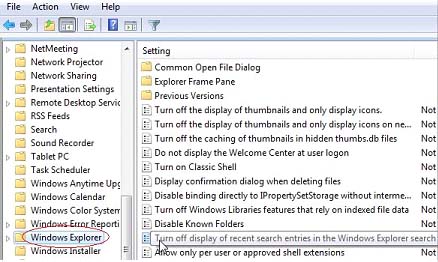
- Scroll down to User Configuration \ Administrative Templates \ Windows Components \ Windows Explorer.
- Double-click on Turn off display of recent search entries in the Windows Explorer search box on the right hand side of the dialog box.
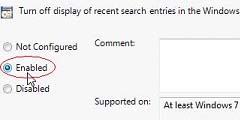
- Select Enabled and click on the Apply button.
- Click on the OK button.
- Close out of the Group Policy Editor.
- Thats it, there Continues to not to display the recent search history as you start typing into the search box.
Below is the Screenshot.

There have been a number of really bad viruses just within the past 6 months. We've seen the W32.Beagle, W32.Netsky, MyDoom, and so on. Most of these viruses were transported or replicated from pc to pc-using email attachments. These are easy to spot if you're paying attention, simply because they are usually executable files, but not always.
Some attachments contain Macros (simple programs that run within other programs, all the titles in Microsoft Office use macros). If you're not that familiar with spotting file extensions, don't worry, that's what I'm here to talk about today. If you are a little hazy on the whole "file extension" thing then let's spend a few moments explaining it.
File extensions are what tell the program how to treat a particular piece of data. For example, most people are somewhat familiar with .doc or a .txt file extensions these are both text documents and when the user opens this file the Operating System looks at this extension and then knows how to open it.
Hackers try to use some sort of eye-grabbing ploy to get you to open their email and activate the virus, which is always an attachment. Most Anti-virus nowadays stops, or at least warns, you of these high risk attachments and even take measures to protect you. However, on the average 10-15 new viruses are created every day and I personally wouldn't count on any program to 100% protect my pc. That's why I scrutinize any email, if I wasn't expecting an attachment, I won't open it until I had a chance to talk to the sender.
Some of the more common file types used to hide viruses include:
- .scr - Windows Screen Saver - USE CAUTION if you receive a screen saver via email. They can contain worms or viruses
- .pif - DO NOT OPEN! This is most likely a virus. Clicking it will run a program or code that can mess up your computer.
- .exe - executable file - a program that contains a virus, Trojan horse, or worm
- .pps - MS PowerPoint (can contain macro virus)
- .zip - Zip (compressed) file
- .vbs - Visual Basic script
- .bat - Executable MS-DOS batch file
- .com - DOS executable command
- .asp - active server page - internet script
- .doc - Word document (can contain macro virus)
- .xls - Excel file (can contain macro virus)
This is in no way a complete list. Just because an attachment may have one of these extensions doesn't mean that it is a virus, but it should send up warning flags. Hackers use clever subject lines, and viruses can appear to come from a friend so keep on your toes and don't fall victim to their deceptive traps. Scan those attachments and verify with the sender before opening.

Advanced SystemCare with Antivirus 2013 Nulled with Serial

It's time to completely fix your slow PC!
Advanced SystemCare Free (formerly Advanced WindowsCare Personal) has a one-click approach to help protect, repair, clean, and optimize your PC. With over 100 MILLION downloads since 2006, this fantastic, award-winning, free PC repair software is a "must-have" tool for your computer. 100% safe with no adware, spyware, or viruses; a PC maintenance program that's incredibly easy to use.
Why waste money on expensive "registry cleaners" to fix your PC when Advanced SystemCare Free will repair, tune, and maintain it for you – for free!

Why Is Advanced SystemCare Free 5 Different ?
- Provides a Complete Solution For PC Top Performance.
- A simple registry cleaner cannot give you true performance boost. Advanced SystemCare Free 5 combines Registry clean, defrag, system tune-up, shortcut fix, privacy sweep, junk files clean, disk fix and optimization, and more, to guarantee your PC run like a new one.
- Finds and Detects More Hidden Problems of Security and Performance.
- With our innovative "DEEP SCAN" technology, Advanced SystemCare Free 5 has the highest detection rate in the industry and it is able to find the right root of your PC trouble.
- Simpler and Easier to Use.
- You do not need to be a professional or know much about computer. All you need to do is install it and a few clicks will make you enjoy the new PC feeling again.
- Proven by More Users.
- Advanced SystemCare is the NO.1 downloaded software in system utilities and has over 10 million users worldwide.
- Speeds up PC performance and internet access Enhanced
- It Tunes up Windows by releasing the built-in power of your system. Dramatically improves both system and Internet performance by up to 400%.
- Defends PC security with extra protection Enhanced
- Detects and analyzes Windows security environment. Scans and removes spyware and adware using up-to-date definition files. Prevents spyware, hackers and hijackers from installing malicious programs on your computer. Erases and updates your PC's activity histories.
- One click to solve as many as 10 common PC problems Enhanced
- Advanced SystemCare 5 inherits the ease-of-use from previous versions, with more powerful capabilities. With one click, it scans and repairs ten PC problems and protects your PC from hidden security threats.
- Real-time optimization with ActiveBoost function New!
- ActiveBoost, technology that actively runs in the background intelligently managing system resources in real-time, constantly detecting inactive resources and optimizing CPU and RAM usage.
Advanced SystemCare Free 5 Product Specs :
Current Version: 5.3.0
File Size: 25.8 MB
Operating System: Designed for Windows 8, Windows 7, Vista, XP and 2000
Release Date: May. 30, 2012
Designed to: Keep your PC safe, error-free, and running at top speed.
Systems Supported :
- Microsoft® Windows® 8
- Microsoft® Windows® 7 (32-bit and 64-bit) Starter/ Home Basic/Home Premium/Professional/Ultimate
- Microsoft® Windows® Vista (32-bit and 64-bit) Starter/Home Basic/Home Premium/Business /Ultimate
- Microsoft® Windows® XP (32-bit and 64-bit) with SP2/SP3 or Home/Professional/Media Center
- Microsoft® Windows® 2000
Hardware Requirements :
- 300 MHz processor or faster processor
- 256 MB of RAM
- 30 MB of free hard disk space
Top 8 reasons why you should choose IObit :
- IObit products will effectively keep your PC safe, error-free, and running at top speed! After all, aren't these the things that you care about the most?
- IObit has gifted and top-flight programmers and systems designers, researching and developing innovative products for you.
- We have some of the most advanced technologies (patents pending) in the industry.
- IObit and its product developers are often recommended by IT experts and editors around the world as clearly being amongst the world's top suppliers of quality Windows utilities.
- Our unique design ideas and technologies make IObit products easier, more efficient, and effective.
- We have more than 100,000,000 downloads since 2005 - feedback says that 98% of those users would recommend IObit products to a friend.
- IObit is trusted and recognized by many companies and organizations around the world.
- You have nothing to lose. Many of our products are 100% free, and our paid products have the lowest prices in the industry with a 30-day money-back satisfaction guarantee!


Most of the users left logged on their computer may represent a security threat for the company. For this purpose, first install the Winexit.scr tools that includes in Windows 2003 Resource Kit (rktools.exe) and you can free download it from Microsoft site.
To use this feature, you will need to be logged into your computer with administrative rights.
After installing the rktools.exe setup, locate the Winexit.scr file in the following location.
C:\Program Files\Windows Resource Kits\Tools

Here right click no Winexit.scr file and select the Install option.
A Display Properties dialog box will appear, select Screen Saver tab and choose "Logoff Screen Saver" entry under the Screen saver area.
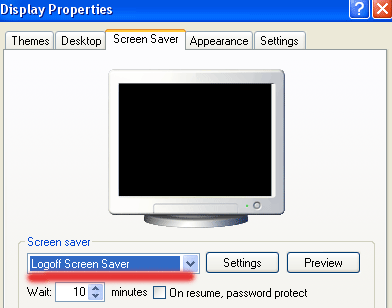
Now click on Setting button, again a small dialog box will appear with the title "WinExit Setup Dialog"

Here select the "Force application termination" check box under the "Force logoff" area
and type the number of seconds in "Countdown for n seconds" box under Time to logoff area.

Now type the message that appears during the logoff countdown timer in the "Logoff Message" box
and click on Ok button.

Click on "Preview" button to verify the settings.
Here a small dialog box will appear with the title "Auto logoff in progress", it displays the countdown
timer and logoff message.

Click on Cancel then Ok button to finish the Process.

It is very easy and interesting to change the name of Recycle Bin of your system.
Follow these Below Steps to do it:
- First click on Start button > click on Run option.
- Type here regedit.exe and press enter then you will find there regedit editor.
- In regedit editor you will open HKEY_CLASSES_ROOT folder, In this folder open the CLSID folder then open the {645FF040-5081-101B-9F08-00AA002F954E} folder >ShellFolder folder at last.
- Here simply change the data value from "40 01 00 20" to "70 01 00 20".

Laptop manufactures gives you the guarantee about the battery that how long it works. The battery of laptop always stops working very early at some stage in essential research, just like when you are watching a DVD movie.
Follow the few steps to increase the laptop battery's life: Lower the backlighting on your screen.
The screen of your Laptop takes up significant amount of power and you do not require its maximum brightness. You should have to check your system and decrease the screen brightness it to a comfortable point.
Stop your wireless signal when you are not using.
After turning off your Laptop can save max. 20 minutes of your laptop's battery time because WiFi can use a considerable quantity of power. By right clicking you can stop your WiFi signal when you are not using.

Manage the correct power scheme in XP
Windows XP contain a number of predetermined power plans, which control settings like how rapidly your laptop turns off and when your screen saver boots in. You can change your laptop power scheme by choosing Control Panel > Power Options. For max. Battery life from the "Power scheme" chooses the option "Max. Battery" and decline the list. There are good choices for you just like "Low Power Mode" and Portable /Laptop. They don't conserve as much power as Max Battery. After selecting a power scheme you click Ok button to finish the process.


You can enable this option to run windows update automatically when your computer will be connected to the internet. Through this service you can check the Microsoft website for downloadable improvements to the operating system and security patches also. These latest updates will protect your computer from the attacks of latest viruses and potential hackers. Windows Update is free of cost and important service that is why always makes sure its running on your computer.
Follow the given steps to enable this important feature on your computer:
To use this feature, you will need to be logged into your computer with administrative rights.
Click Start button and go to Settings then click on Control Panel option. Now system will open the Control Panel windows with different categories.

Just click on System option, a small System Properties dialog box will appear with many options like System Restore, Remote and Automatic Updates and others.

Click on Automatic Updates tab, if it is not selected already then click on “Automatic (recommended)” box. Then this will display the different setting to continually check Microsoft’s website for updates.

Here you can pick a download and installation schedule or select the option “Download the updates automatically and notify me when they are ready to be installed” in the section of settings. Through this option you can download updates automatically and it will install the updates immediately.
If you wait a day or two before installing an updates to make sure there are not any serious bugs reported about the latest patch you can check it through Microsoft website. Now click on Ok button to finish the process.

Today tip will help you to enjoy the quick and easy way to find lost files on your computer. Here I recommends you, try to search a file with its file extensions (for example for word file, type *.doc, Excel *.xls, Acrobat *.pdf, *.ppt and *.exe for executable files. If you don't know the name of file but know that it contains a string of text then try to search for files containing specific text, type the text you want to find from any file or folder. This is time taking process but creates very precise result. In Look in, click the drive, folder, or network you want to search. To save time, always select the specified drive or location instead of whole computer.

Click Start Button, point to Search, and then click For File or Folders, a Search Results dialog box will appear. In Search for files or folders named, type the file name or folder name you want to find in containing text.
To specify additional search criteria, click Search Options, and then click one or more of the following options to narrow your search:
- Select Date to look for files that were created or modified on or between specific dates.
- Select Type to look for files of a specific type, such as a text or WordPad document.
- Select Size to look for files of a specific size.
- Select Advanced Options to specify additional search criteria.
- Click Search now.

It's Windows reimagined and reinvented from a solid core of Windows 7 speed and reliability. It's an all-new touch interface. It's a new Windows for new devices. And it's easy to try now—whether you're installing it for the first time, or moving from Windows 8 Consumer Preview.
I Have Tried The Preview Version and it's Simply Cool and didn't Expected Windows Will Come with like this Experiment. Have a Look at Official Website of Windows 8 and Try it Now.
Click Here to Visit and Download from Windows 8 Website.

Some times Some websites banned by Government, ISP and may be by your office network administrator.
This Tricks are very useful, if you are using internet particularly in school, college and office.
Follow any of the Below Tricks to Enable or to Access the Websites :
Trick 1: Search the banned website, for example www.example.com in Google and yahoo search engine then open the cached copy of that page to access the website. You can get also cache link of that website, if you search in Google with keyword cache:URL name and get cache link to access the website.
Trick 2: Another method to access the banned website using its IP address, because you can open the website with IP address instead of actual URL name. This Trick bypasses the URL based restrictions. For example if www.example.com is banned in your school, you can open it using IP address 216.178.32.51. You can search online IP conversion tools to get IP address of any website.
Trick 3: There are some mini web browsers can help you to open the banned websites, for example Opera Mini Browser, install it and try to open any banned website. Another Real Player browser can successfully help you to access the banned website. This Real Player browser bypasses the many restrictions of website banned tools.
Trick 4: There any many websites Anonymizer tools are available to fetch the banned website. These anonymous surfing tools that protect your identity on the internet and give the access to banned sites. As far as the service provider is concerned you are viewing a page from Anonymizer and not the blocked site.
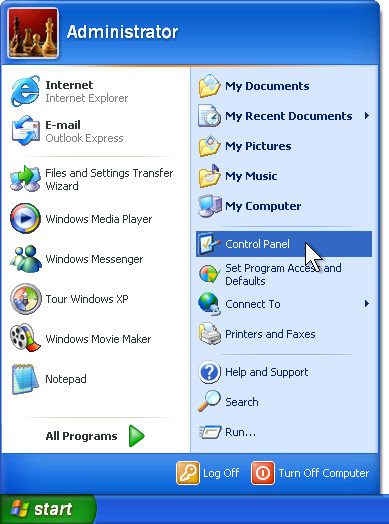
Usually Sometimes You will be Unable to Open the Control Panel if the Virus Security blocks the Registry.
The Below Post may be Useful to you to Enable it 2nd Time in System.
Different antivirus and firewall programs are used to manage the security of the computer. Some times this is build-in antivirus or firewall program in windows XP to maintain the computer security.
But if your windows is not provided with any antivirus, firewall program and Automatic Updates, your windows security center will alerts you a message "Your computer may be at risk. Your virus protection status is unknown" with useless repeating reminder.
You can disable this message permanently by changing the values of “AntiVirusDisableNotify” in windows registry.
Follow the given steps to edit the computer registry for disable message:
- First click on Start button then type Regedit in Run option.
- Here locate the location to: · HKEY_LOCAL_MACHINE\SOFTWARE\Microsoft\Security Center
- Here in right side panel, double click on AntiVirusDisableNotify and set its value 1.
- Finally Close All Programs and Re-Start Your System to Check the Effects.

Usually PC Users will end the Running tasks the Un-Responsive programs manually using windows Task Manager with (CTRL + ALT +DELETE) keys.
Sometimes these non-responsive programs creates problem to run windows and others programs properly.
You can configure your computer to manage these non-responsive programs automatically.
Windows has a feature that will close all non responding program automatically.
If you have little knowledge about editing windows registry then you can configure your computer for this purpose.
Follow the given steps to configure windows registry for auto end task:
First click on Start button then type Regedit in Run option. Here locate the location to:
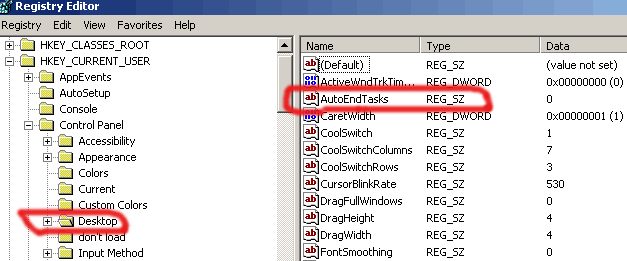
Go to Hkey_Current_User\Control Panel\Desktop
Here in right side panel, double click on AutoEndTasks and here its default value is 0. Now change it to 1. Now windows will close your all non-responsive programs automatically.
Finally Now Close All Running Programs in Your System and Re-Start Your System Once to See the Changes that you have Made.

Usually When you are working on your local computer and want to refresh any changes in your system automatically.
For example some times you are watching sports results, online Stock Exchange rates and any changes to your hard drive but these changes are not usually refreshed until you press the F5 key on your keyboard.
To refresh your screen automatically you should edit your system Registry.
But the best technique to edit the windows registry keys, always export or backup the whole windows registry keys on backup drive before editing.
Because if you do any mistake in Registry can cause serious problem in your computer to run properly.
Follow the below given steps to change the updates automatically.
- First click on Start button then type Regedit in Run option.
- In Registry Editor panel go to the path: HKEY_LOCAL_MACHINE / System / CurrentControlSet / Control / Update Mode
- Here in right hand side panel edit the DWORD value to be between 1 and 5.
- Now restart your computer after any changes to go into effect.

Follow the Steps Below to Take the Entire System Backup Regularly to Keep Your Files Safe!
Back up regularly your data : It is important factor for you to get backup your files and folder on a regular basis. Because in this global network a computer can crash, a virus, or a hard drive failure can wipe out everything. Don't make this mistake, It depend upon you and your data importance but better technique is that back up everything at least once a week. But if you use your computer daily, it is best to back up important files daily and other data weekly.
Keep several backup copies of same backup : Never back up over a previous backup copy, always try to keep several copies over time so that if one time one back create problem you can user others.. Remember, a problem that is backed up will remain a problem when restored!
Easy way for backup using Be selective method : You don't have to do a total system backup of your system over time, If your are doing so, you are wasting your time. Just back up your important files, folder and photos. Backing up the entire hard drive is time-consuming, not practical, and should not be done. A backup of specific data files is the way to go. But a best technique is that first install your all computer program and system drivers then do a backup using any third party software (cloning software) like Norton ghost or others of your C drive once, this backup will help you to restore your all computer program in 15 min in case of any problem and do important data backup daily or weekly.
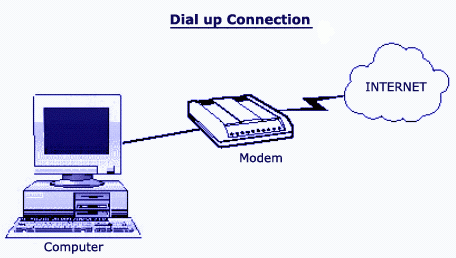
This Post Says to How to Create or Configure New Dial-up Connections in Windows XP.
Go to Start, then select Control Panel then click Network Connections.
Select Create a New Connection. This brings up the New Connection, which help you to create a new connection.
- Select Connect to the Internet and Click the Next button to continue with the wizard.
- Select Setup my Internet connection manually and Click the Next button.
- Select Connect using a dial-up modem and Click the Next button.
- Type your ISP name in the ISP Name text box. Click Next.
- Enter ISP dial up Phone Number.
- Type your Username and Password.
- Click the Next button to continue.
- Now click Finish to create the icon and finish the setup.
You can shutdown your computer with a single click on the desktop shutdown icon. You can set the time when your computer starts the shutdown process. A simple click on shutdown icon, close the all running applications and start shutting down properly after predefined time. This tip is very useful to save energy and time. After the execution of this command, a small window will appear to start count time of system shutdown.
Follow the given steps to create the shutdown icon:
To create a new shortcut, right click on any empty area of your desktop and go to New then Shortcut.


Follow the given steps to create the shutdown icon:
To create a new shortcut, right click on any empty area of your desktop and go to New then Shortcut.
Now a small windows dialog box will appear with the title “Create Windows”. In the “Create Shortcut” window, type the following command.
SHUTDOWN -s -t 30
Here t 30 mean time in second, for example if you want your computer will shutdown automatically after half minute then the command will be shutdown -s -t 30.
Click Next button to type the name of this shortcut and press Finish to close it.
At the end, when you click on shutdown icon, a windows dialog box will appear with the information” This system is shutting down. Please save all work in progress and log off. Any unsaved changes will be lost. This shutdown was initiated by administrator”.
And the Final Preview Would be Look Like This :
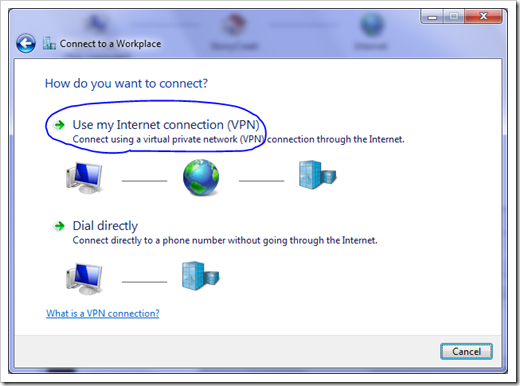
This Below Tutorial will help to Connect Virtual Private Network in Windows Operating System :
- Open the Network Connections option in Control Panel. A list of existing dial-up and LAN connections will appear.
- Choose the 'Create a new connection' option from the left-hand side of the window. First click Next to begin the wizard, then choose the 'Connect to the network at my workplace' item from the list and click Next.
- On the Network Connection page of the wizard, choose the 'Virtual Private Network connection' option and click Next.
- Here type a name for the new VPN connection in the 'Company Name' field and click Next.
- Choose an option on the 'Public Network' screen and click Next. The default option, 'Automatically dial this initial connection' can be used if the VPN connection will always be initiated when the computer is not already connected to the Internet. Otherwise, choose the 'Do not dial the initial connection' option. This option requires that the public Internet connection be established first, before this new VPN connection will be initiated.
- Enter the IP address of the VPN remote access server to connect to, and click Next.
- Choose an option on the "Connection Availability" screen and click Next. The default option, 'My Use Only,' ensures that Windows will make this new connection available only to the currently logged on user. Otherwise, choose the 'Anyone's use' option.
- And the Final Step Click Finish to complete the wizard.

Steps for Formatting the Windows XP System and Installating the New Opertaing System :
For Windows XP Downloads : Click Here
For Windows XP Products Review : Click Here
1.First of all insert the windows xp bootable disc into the drive and restart the computer
2.The the screen displays "Press any key from boot CD" Press ENTER (If windows starts automatically without displaying such a message then follow the Step-A)
3.System will load some files please wait untill it completes it takes some time
4.After that "Windows XP Professional setup " will appear Press ENTER
5.After that "Windows XP Licencing aggrement " will appear Press F8
6.Again "Windows XP Professional setup " will appear Press ESC
7.Now the system shows an other screen containing your Hard disc partition drives, if you need to format only C-Drive the select C-Drive using arrow keys in keyboard and Press ENTER (Or if you wanted to format total system follow Step-B)
8.In the next screen Select "Format the partition using NTFS file system " Press ENTER
9.Now the setup will Formats your C-Drive and next it will copies files, it takes much time, be patient
10.Now the system starts rebooting wait for 15 seconds or Press ENTER to reboot immediately
11.System gets restarted And again asks "Press any key from boot cd" But please dont press any key
12.Windows starts installing, it takes approximately 39Minutes to install but dont go away from system there is some manual work while installing
13.Exactly after 6 Minutes system displays an message box click on Next using Mouse
14.In the next screen "Personalize your software" will displays enter your Name and organization
15.Enter The Windows XP key in the next screen and Press ENTER
16.In the next screen it asks for computer name enter the name and there is also another field asking adminstrator password, leave it empty and Press ENTER
17.In the next screen set the Date and Time zone (+5:30) and click Next
18.Setup still requires 29minutes of time to complete and after that it gets restarts And again asks "Press any key from boot cd" But please dont press any key
19.In the Next Screen "Display Setting Box" Will Appear Click OK And "Monitor Setting Box" Also Appear Again Click OK, Then The Window Gets Started
20.Click on NEXT it And Next Select Help Protect My PC And Then Click Next And then Enter Your User Name (Different From Computer Name) Click Next And Then Click Finish :)This Is The Way To Format Your System Easily :)Exceptional Cases
STEP-A::Again Restart Your Computer And While restarting
Continuously press DELETE button in the keyboard
* "Advanced BIOS Features" Will Displayed* Click On First Boot Device And Press Enter*Select CD-ROM By Using Up_Down Arrows in Keyboard and Press
Enter*Press F 10*Press Y And Then Press ENTERThen the System Again restarts And Now it Will Ask "Press any key
from boot cd" Then Continue From Step 3
STEP-B::If You Wanted To Format Your System Completely Follow These Steps
*Select The C-Drive And Then Press D And then Press ENTER And
Then Press L*In The Same Way Delete All Drives D,E,F... By Clicking L and D
Keys*Your Hard Disk Will be In A Single unpartitioned Space Form Now
Our work is to create Drives with Suitable Memmory For Each Drive*For Example If You Have 160GB Hard Disc And You Want 4 Drives
Give 40 GB For Each Drive(Partition need not be same for all drives
we can give (40+40+40+40) Or (30+40+40+50) Or (30+30+40+40+20)
Etc....*To Make Partition First Click On The Unpartitioned Space and Press
C And Press ENTER And Give The Appropriate Memory Space Such
That C-Drive Created*Agian Click IOn The Unparyioned Space And Create D-Drive.. In
The Same Way Create All Other Drives By Clicking C*After Partition Select C Drive and Press Enter.. Thats it The Windows
Setup Will Be Installed

Deciding whether to buy a Mac or a PC should be based on two main points: your budget and whether the computer is primarily for business or pleasure. Both types of computers are excellent for specific tasks, although if you are planning to go to work and bring your computer with you, you may need to consider what types of computers your coworkers will have to make it easier to swap files or compare notes. Here a few basic tips on how to choose the right computer for you.
Budget
There’s no debate—Macs are far more expensive than PCs. If money is a big issue for you, you’ll want to buy a PC. However, Macs aren’t overpriced. Unlike PCs, each computer is designed for maximum efficiency in both processing speed and ease of use. While PCs frequently crash and are vulnerable to spyware and viruses, Macs resist most viral attacks and operate at a consistently high standard with virtually no technical issues. If you can afford it, a Mac is an excellent investment which will work for you for years.
Business
While Macs have always been the preferred computer of graphic designers and other creative individuals, for most corporate office work, PCs have long been favored over Macs. For this reason, PCs still dominate in most business settings.
Up until a few years ago, the major software designed for business suites, like the Microsoft Suite, was designed chiefly for PCs. However, the popularity of other Apple products such as the iPod and iPad has started to change the way Macs are perceived in the larger corporate world. Most business software now has versions available for both Macs and PCs. Because of their heftier price tag, Macs still have a long way to go in making a dent in the corporate world, although in terms of functionality they perform just as well as a PC.
Graphically, Macs have richer displays and a Linux based operating system that makes them ideal for manipulating complex information such as layered graphical displays. Photoshop was initially designed for the Mac. If you are buying a computer for use in a professionally creative setting, your coworkers will likely also be using Macs.
Programming
Computer programmers are evenly split on whether Macs or PCs make better programming tools. The truth is, it comes down to a matter of personal preference. Macs developed a comprehensive suite of developer tools with their OS 10 which, if used properly, can help you get to the moon. PCs have always been oriented toward programming; in fact, the DOS/Windows interface was developed mainly as a way to stay competitive with the user friendly Mac interface. However, many programmers have complained that Macs are slower than PCs when it comes down to executing large amounts of freshly programmed code.
Personal Use
If you enjoy playing video games in your spare time, buying a PC is probably the best choice. This is partly because PCs are easier to hook up to auxiliary equipment like television sets or other devices. Although USB ports are evenly distributed between Macs and PC, the higher data transfer portals of a Mac do not always adapt easily to most conventional televisions, making it difficult to quickly relay information between the two devices, whereas the higher data transfer portals of a PC are usually very adaptable to auxiliary devices.
If, on the other hand, you prefer to design or develop creative projects in your personal time, Macs are a much better choice. Because Apple has invested so much time in making the user interface incredibly easy to use, spending time creating music or drawing or editing movies becomes less about the computer and more about the activity; you forget you are using a computer, and can instead focus on the act of creation. PCs have a more rigid approach; it’s hard to forget that you’re on a computer.
Cloud Computing and the Future of Virtualization
Of course, with the tech community excited about the potential of cloud computing, computer memory is going to become less of an issue, with flexibility, mobility, and processing speed becoming increasingly important when making purchasing decisions. Mac’s suite of mobile devices are far better adapted to shifting between different geographical areas while also offering enough functionality to make them viable business tools. However, for now you should buy the computer that best suits your needs, and plan on the inevitable: no matter what you buy now, in a few years it will be completely outdated anyway!

Blogging has developed from a specialized hobby to a full-time occupation. Many writers live off of their blogs, and anyone with something unique to say can gain an audience and a steady paycheck with the right techniques.
Starting A New Blog
Launching a blog requires some planning. This starts with the name and address of the blog.
It’s important to pick a good domain name, as the URL of a website is one of the most powerful tools that a blogger has at his disposal for repeat traffic. Think of a domain name as a 21st century toll free number: It has to be memorable or it won’t be effective.
blog’s domain name should be descriptive of its subject and preferably a bit unusual. For example, a blog about arrowheads could simply be titled, “Arrowheads And How To Identify Them,” but something like “As The Arrowhead Flies” would be more memorable.
Bloggers should also try to pick a unique subject or to bring a unique perspective to the entries. Writing about hundreds of subjects will rarely lead to a successful blog. Content should be focused and direct. Visitors should know exactly what type of information that they can find on the blog, and using direct and simple approach improves the chances of regular traffic.
Blog Hosting Providers
Most bloggers use a hosting provider like WordPress.com or Blogger. There are several major advantages to these services. They’re inexpensive and may even be free until a blog develops large amounts of regular traffic. Also, the online blogging software provided by these hosting services offers instant, easy organization for a blog of any size.
Many bloggers know only basic HTML and don’t really want to invest a lot of time into things like page design. For these individuals, integration with a hosting provider can keep costs down while streamlining the blogging process. They’re also ideal for first time bloggers because they simplify the process. By using a hosting provider you’ll spend more time writing and less time worrying about page design and web programming languages.
Professional and amateur bloggers will need to consider the price and uptime of various hosting providers before making a selection. The service packages of websites like WordPress.com and Blogger change quite often in both price and offerings. It’s usually a good idea to start out with a package that offers at least 50% more capability for incoming traffic than you plan on using each month. This way, your blog won’t suddenly crash if you write a successful post.
Blogging services can quickly become expensive. They’re worth the money in the long run, as they’ll allow you to keep all of the earnings from ads on your new blog–which is something that free alternatives with “unlimited bandwidth” won’t offer you.
Speaking of money, you’ll have to be on the lookout for ways to make a profit from a blog. Most blogs use ads from Google and Amazon Marketplace. Many bloggers also offer other services and products directly from their sites.
Promoting Your Blog
Blogs need to be promoted in order to flourish. It’s very rare for a blog to receive large amounts of traffic from search engines like Google alone, especially when the blog’s just getting started. A good promotion strategy is absolutely essential, and a strong promotion strategy begins with social media websites.
Promote each blog post from a new blog on websites like Twitter and Facebook. Don’t spam your friends and followers; only post a single link to each blog post, and try to reach out to other bloggers through social websites. Developing a relationship with other writers will allow you to learn about the good habits that lead to regular traffic. You can even ask another writer to post a guest entry on your blog from time to time. This is a good way to build an audience of regular readers.
Always check the comments for each entry and respond to your readers. Cultivate a sense of community by interacting with each commenter and even addressing some of their questions or comments directly in new blog posts. This encourages the return traffic that is important for a new blog.
Finally, blog regularly. Any blog will fail if it doesn’t have regular posts. Posting once a day or more will keep visitors coming back and will quickly lead to better opportunities for money and better traffic. Every blogger should consider consistency to be extremely important–keep a consistent stream of quality entries for the best possible success.
I recommend for the Starters to Select Blogger Service for the Best Options and Easy Blogging.