
From the user standpoint, email seems so simple. You set the email address of the person to whom you want to send the email, compose your message and click 'Send'.
All done.
In reality, sending your message off into the network cloud is a bit like sending Little Red Riding Hood into the deep dark woods. You never know what might happen.
In this diagram, the sender is a human being using their company account to send an email to someone at a different company.
Step A: Sender creates and sends an email
The originating sender creates an email in their Mail User Agent (MUA) and clicks 'Send'. The MUA is the application the originating sender uses to compose and read email, such as Eudora, Outlook, etc.
Step B: Sender's MDA/MTA routes the email
The sender's MUA transfers the email to a Mail Delivery Agent (MDA). Frequently, the sender's MTA also handles the responsibilities of an MDA. Several of the most common MTAs do this, including sendmail and qmail (which Kavi uses).
The MDA/MTA accepts the email, then routes it to local mailboxes or forwards it if it isn't locally addressed.
In our diagram, an MDA forwards the email to an MTA and it enters the first of a series of "network clouds," labeled as a "Company Network" cloud.
Step C: Network Cloud
An email can encounter a network cloud within a large company or ISP, or the largest network cloud in existence: the Internet. The network cloud may encompass a multitude of mail servers, DNS servers, routers, lions, tigers, bears (wolves!) and other devices and services too numerous to mention. These are prone to be slow when processing an unusually heavy load, temporarily unable to receive an email when taken down for maintenance, and sometimes may not have identified themselves properly to the Internet through the Domain Name System (DNS) so that other MTAs in the network cloud are unable to deliver mail as addressed. These devices may be protected by firewalls, spam filters and malware detection software that may bounce or even delete an email. When an email is deleted by this kind of software, it tends to fail silently, so the sender is given no information about where or when the delivery failure occurred.
Email service providers and other companies that process a large volume of email often have their own, private network clouds. These organizations commonly have multiple mail servers, and route all email through a central gateway server (i.e., mail hub) that redistributes mail to whichever MTA is available. Email on these secondary MTAs must usually wait for the primary MTA (i.e., the designated host for that domain) to become available, at which time the secondary mail server will transfer its messages to the primary MTA.
Step D: Email Queue
The email in the diagram is addressed to someone at another company, so it enters an email queue with other outgoing email messages. If there is a high volume of mail in the queue—either because there are many messages or the messages are unusually large, or both—the message will be delayed in the queue until the MTA processes the messages ahead of it.
Step E: MTA to MTA Transfer
When transferring an email, the sending MTA handles all aspects of mail delivery until the message has been either accepted or rejected by the receiving MTA.
As the email clears the queue, it enters the Internet network cloud, where it is routed along a host-to-host chain of servers. Each MTA in the Internet network cloud needs to "stop and ask directions" from the Domain Name System (DNS) in order to identify the next MTA in the delivery chain. The exact route depends partly on server availability and mostly on which MTA can be found to accept email for the domain specified in the address. Most email takes a path that is dependent on server availability, so a pair of messages originating from the same host and addressed to the same receiving host could take different paths. These days, it's mostly spammers that specify any part of the path, deliberately routing their message through a series of relay servers in an attempt to obscure the true origin of the message.
To find the recipient's IP address and mailbox, the MTA must drill down through the Domain Name System (DNS), which consists of a set of servers distributed across the Internet. Beginning with the root nameservers at the top-level domain (.tld), then domain nameservers that handle requests for domains within that .tld, and eventually to nameservers that know about the local domain.
DNS resolution and transfer process
- There are 13 root servers serving the top-level domains (e.g., .org, .com, .edu, .gov, .net, etc.). These root servers refer requests for a given domain to the root name servers that handle requests for that tld. In practice, this step is seldom necessary.
- The MTA can bypass this step because it has already knows which domain name servers handle requests for these .tlds. It asks the appropriate DNS server which Mail Exchange (MX) servers have knowledge of the subdomain or local host in the email address. The DNS server responds with an MX record: a prioritized list of MX servers for this domain.
- An MX server is really an MTA wearing a different hat, just like a person who holds two jobs with different job titles (or three, if the MTA also handles the responsibilities of an MDA). To the DNS server, the server that accepts messages is an MX server. When is transferring messages, it is called an MTA.
- The MTA contacts the MX servers on the MX record in order of priority until it finds the designated host for that address domain.
- The sending MTA asks if the host accepts messages for the recipient's username at that domain (i.e., username@domain.tld) and transfers the message.
Step F: Firewalls, Spam and Virus Filters
The transfer process described in the last step is somewhat simplified. An email may be transferred to more than one MTA within a network cloud and is likely to be passed to at least one firewall before it reaches it's destination.
An email encountering a firewall may be tested by spam and virus filters before it is allowed to pass inside the firewall. These filters test to see if the message qualifies as spam or malware. If the message contains malware, the file is usually quarantined and the sender is notified. If the message is identified as spam, it will probably be deleted without notifying the sender.
Spam is difficult to detect because it can assume so many different forms, so spam filters test on a broad set of criteria and tend to misclassify a significant number of messages as spam, particularly messages from mailing lists. When an email from a list or other automated source seems to have vanished somewhere in the network cloud, the culprit is usually a spam filter at the receiver's ISP or company. This explained in greater detail in Virus Scanning and Spam Blocking.
Delivery
In the diagram, the email makes it past the hazards of the spam trap...er...filter, and is accepted for delivery by the receiver's MTA. The MTA calls a local MDA to deliver the mail to the correct mailbox, where it will sit until it is retrieved by the recipient's MUA.
RFCs
Documents that define email standards are called "Request For Comments (RFCs)", and are available on the Internet through the Internet Engineering Task Force (IETF) website. There are many RFCs and they form a somewhat complex, interlocking set of standards, but they are a font of information for anyone interested in gaining a deeper understanding of email.

- Login to your BigRock account by clicking on ‘My Account’ on BigRock’s Website: http://www.bigrock.com/
- Enter your Registered Email Address and Password with BigRock and click on Login
- In the List of Orders page, click on your Domain Name beside Domain Registration for which you want to create an Email Address.
- Click on Email option to the right side of the page.
- Click on the Manage Email option in the Email section to the left side of the page.
- You will now be able to view the Email Dashboard (Email Admin Panel) from where you can Create and Manage the Email accounts for your Domain. Click on Add User to Create a New Email Account for your domain.
- Fill in all the Details of the Form and click on Add User to successfully create a new Email Account.
- Please note the System Generated Password of your Email Account and the Webmail URL.
- The webmail URL will be http://webmail.yourdomainname
- For ex: If your domain name is wikiblog.in, then the Webmail URL will be http://webmail.wikiblog.in
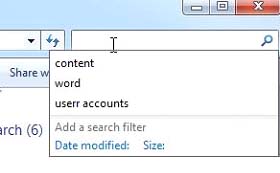
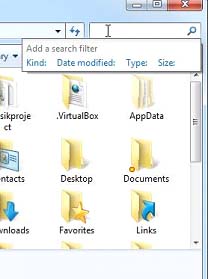
Windows 7 automatically saves all the recent searches done by the users. Some people are annoyed by this feature as the last three searches become visible under the search box as you start typing in it. If the computer is shared by others, you might not want others to see your past searches. There is a way in which you can disable search history display in Windows 7. However, you cannot disable search history display in Windows 7 Home editions. This is due to the fact that you need to utilize the Group Policy Editor for achieving this goal and it is not available in the Home versions.
Follow these steps to disable search history display in Windows 7:
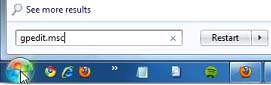
- Enter gpedit.msc in the search box of the Start menu. Press Enter. This will open the Local Group Policy Editor.
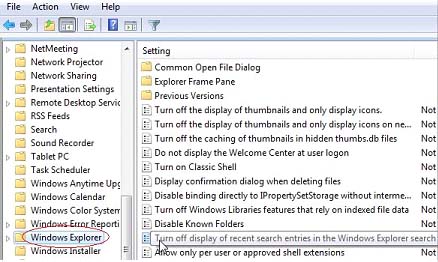
- Scroll down to User Configuration \ Administrative Templates \ Windows Components \ Windows Explorer.
- Double-click on Turn off display of recent search entries in the Windows Explorer search box on the right hand side of the dialog box.
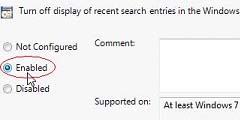
- Select Enabled and click on the Apply button.
- Click on the OK button.
- Close out of the Group Policy Editor.
- Thats it, there Continues to not to display the recent search history as you start typing into the search box.
Below is the Screenshot.

There have been a number of really bad viruses just within the past 6 months. We've seen the W32.Beagle, W32.Netsky, MyDoom, and so on. Most of these viruses were transported or replicated from pc to pc-using email attachments. These are easy to spot if you're paying attention, simply because they are usually executable files, but not always.
Some attachments contain Macros (simple programs that run within other programs, all the titles in Microsoft Office use macros). If you're not that familiar with spotting file extensions, don't worry, that's what I'm here to talk about today. If you are a little hazy on the whole "file extension" thing then let's spend a few moments explaining it.
File extensions are what tell the program how to treat a particular piece of data. For example, most people are somewhat familiar with .doc or a .txt file extensions these are both text documents and when the user opens this file the Operating System looks at this extension and then knows how to open it.
Hackers try to use some sort of eye-grabbing ploy to get you to open their email and activate the virus, which is always an attachment. Most Anti-virus nowadays stops, or at least warns, you of these high risk attachments and even take measures to protect you. However, on the average 10-15 new viruses are created every day and I personally wouldn't count on any program to 100% protect my pc. That's why I scrutinize any email, if I wasn't expecting an attachment, I won't open it until I had a chance to talk to the sender.
Some of the more common file types used to hide viruses include:
- .scr - Windows Screen Saver - USE CAUTION if you receive a screen saver via email. They can contain worms or viruses
- .pif - DO NOT OPEN! This is most likely a virus. Clicking it will run a program or code that can mess up your computer.
- .exe - executable file - a program that contains a virus, Trojan horse, or worm
- .pps - MS PowerPoint (can contain macro virus)
- .zip - Zip (compressed) file
- .vbs - Visual Basic script
- .bat - Executable MS-DOS batch file
- .com - DOS executable command
- .asp - active server page - internet script
- .doc - Word document (can contain macro virus)
- .xls - Excel file (can contain macro virus)
This is in no way a complete list. Just because an attachment may have one of these extensions doesn't mean that it is a virus, but it should send up warning flags. Hackers use clever subject lines, and viruses can appear to come from a friend so keep on your toes and don't fall victim to their deceptive traps. Scan those attachments and verify with the sender before opening.

An increasing number of people of all ages own mobile phones, enjoying the convenience, freedom and re-assurance they provide. There is a range of different handsets and contracts available, providing mobile communication solutions to suit Customers.
Below Points may be Useful to you and if you Follow :
- Fix your budget: Before you do anything else, think about why you want a mobile phone and determine your budget. There are numerous types of call plan, to suit various budgets and needs. There are also services available to help you keep track of what you spend consider whether this would help you and check out what options are available.
- What are your usage patterns: How often will you be using the phone, at what time of day and what will be your average call length? Will you be using the phone mostly for voice calls, or to SMS friends? Your usage patterns may help determine what type of plan is best for you and your budget.
- What types of plan are available: There are four basic types of service agreement: fixed-term contracts, monthly plans, pre-paid or leasing. Pre-paid is ideal if you want to ensure you stay within a specified budget - perfect for teenagers. Getting a pre-paid first is also a good way of finding out what your usage is and helping you decide what type of plan might best suit you. Monthly plans allow you the flexibility of receiving monthly bills without signing a long-term contract. Business users may prefer the convenience of fixed-term, while leasing may suit you if you only need a phone and handset for a short time. New capped' plans (available post or pre-paid, depending on mobile carrier) also offer convenience and value and may suit many users.
- What are the call rates within each plan: Call rates vary from plan-to-plan. It's important to assess both the rates and the call charge calculation methods when assessing your options. Issues to consider include: How are call charges calculated? On some plans you will be billed per second, on others, per block of time used (usually per 30 or 60 seconds), or, on the newer capped' deals (post and pre-paid), call caps' apply to many services, providing value and certainty; Is there a flag fall (an amount paid for each connection, in addition to call costs)? Are there any special offers (eg cheaper calls off-peak, or to friends on the same network, or for SMS)?
- What features do you need in a handset: A basic handset will allow you to make calls and send and receive SMS. You'll need a more sophisticated one if you want to use the phone abroad, use MMS, voice recording, make video calls, download video or access the internet. Other features to consider are battery capacity (some handsets run longer between charges than others), ease of use, and your coverage requirements (see coverage'). Consider what you really need or you'll be paying for features you never use. If you already have a handset, are you eligible for other plans?
- How much flexibility do you need: Consider your need for flexibility - and your budget - before you buy a handset or take out a plan. Are you likely to want the flexibility to upgrade your handset when a new one becomes available? Might you want to change to a different plan in six months? There are many different options for paying for handsets (e.g. up-front, flexi-rent deals, as part of your service agreement), and different plans (whether pre-paid or post-paid) have different terms and conditions for example some include penalties for changing networks, or plans, for example. Read the small print and check you can meet all the minimum conditions of the contract before signing anything.
- What coverage do you require: Where will you be using the phone only in metropolitan areas, or in the country? The two dominant types of mobile network are GSM and CDMA. Check with the carriers where they have coverage to ensure they can provide the service where you need it before signing up. Your coverage requirements may also affect your handset choice (there are CDMA and GSM handsets).
- Evaluate the options: Once you've worked out what you need/want, do your homework; shop around and compare what is available, and what will best suit your likely usage and budget.

About :
Data and information are as important for an organization as blood in human body. In case data and information become unavailable due to any reason, all the working of the organization stops and it becomes unmanageable loss. In order to avoid such big loss, Database Administrator (DBA) must take backup of his database frequently according to the nature of the database. Normally full backup are done after one week but incremental backup are done on daily basis. Backup can be defined as second copy of original database produced by backup facilities provided by DBMS or operating system. This second copy or saved copy of original database is produced on separate storage media such as magnetic tape, external hard disk and on CD-drives. These should be placed in a separate and secure location, where unauthorized persons do not have any access. The best way, you can store your database backup online using Internet and you can access this backup any time, from any location using Internet. There are two important types of backup.
What is Hot Backup Database :
You can say hot backup is dynamic or active backup. Hot backup is taken when database is running and data is being updated, added, or read by its users but doesn't handle running transactions. Only database management system (DBMS) facility can be used to take hot backups. Make sure that hot backups should only be done during low working hours. Hot backup is taken in environments where database needs to remain online 24-hours a days and 7-days a week, because they do not require downtime as in cold backup.
What is Cold Backup Database :
Cold backup is taken when database is offline, not accessible for updating and users cannot do anything on the database.. DBMS as well as operating system facilities can be used to take the cold backup. Normally, cold backup is taken at the end of a working day or at weekends when database comes offline. Cold backup is suitable in environments where database is not running 24-hours a day. Instead, there are sometime intervals when it remains off.
Backups can be taken manually through the DBA or these can be taken automatically by configuring the DBMS. In case of automatic backups, you must specify day, time, and location on storage media where DBMS will take the backups. These settings are required when configuring the DBMS.

Most of the users left logged on their computer may represent a security threat for the company. For this purpose, first install the Winexit.scr tools that includes in Windows 2003 Resource Kit (rktools.exe) and you can free download it from Microsoft site.
To use this feature, you will need to be logged into your computer with administrative rights.
After installing the rktools.exe setup, locate the Winexit.scr file in the following location.
C:\Program Files\Windows Resource Kits\Tools

Here right click no Winexit.scr file and select the Install option.
A Display Properties dialog box will appear, select Screen Saver tab and choose "Logoff Screen Saver" entry under the Screen saver area.
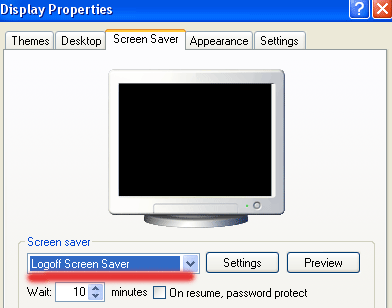
Now click on Setting button, again a small dialog box will appear with the title "WinExit Setup Dialog"

Here select the "Force application termination" check box under the "Force logoff" area
and type the number of seconds in "Countdown for n seconds" box under Time to logoff area.

Now type the message that appears during the logoff countdown timer in the "Logoff Message" box
and click on Ok button.

Click on "Preview" button to verify the settings.
Here a small dialog box will appear with the title "Auto logoff in progress", it displays the countdown
timer and logoff message.

Click on Cancel then Ok button to finish the Process.

It is very easy and interesting to change the name of Recycle Bin of your system.
Follow these Below Steps to do it:
- First click on Start button > click on Run option.
- Type here regedit.exe and press enter then you will find there regedit editor.
- In regedit editor you will open HKEY_CLASSES_ROOT folder, In this folder open the CLSID folder then open the {645FF040-5081-101B-9F08-00AA002F954E} folder >ShellFolder folder at last.
- Here simply change the data value from "40 01 00 20" to "70 01 00 20".

Laptop manufactures gives you the guarantee about the battery that how long it works. The battery of laptop always stops working very early at some stage in essential research, just like when you are watching a DVD movie.
Follow the few steps to increase the laptop battery's life: Lower the backlighting on your screen.
The screen of your Laptop takes up significant amount of power and you do not require its maximum brightness. You should have to check your system and decrease the screen brightness it to a comfortable point.
Stop your wireless signal when you are not using.
After turning off your Laptop can save max. 20 minutes of your laptop's battery time because WiFi can use a considerable quantity of power. By right clicking you can stop your WiFi signal when you are not using.

Manage the correct power scheme in XP
Windows XP contain a number of predetermined power plans, which control settings like how rapidly your laptop turns off and when your screen saver boots in. You can change your laptop power scheme by choosing Control Panel > Power Options. For max. Battery life from the "Power scheme" chooses the option "Max. Battery" and decline the list. There are good choices for you just like "Low Power Mode" and Portable /Laptop. They don't conserve as much power as Max Battery. After selecting a power scheme you click Ok button to finish the process.


You can enable this option to run windows update automatically when your computer will be connected to the internet. Through this service you can check the Microsoft website for downloadable improvements to the operating system and security patches also. These latest updates will protect your computer from the attacks of latest viruses and potential hackers. Windows Update is free of cost and important service that is why always makes sure its running on your computer.
Follow the given steps to enable this important feature on your computer:
To use this feature, you will need to be logged into your computer with administrative rights.
Click Start button and go to Settings then click on Control Panel option. Now system will open the Control Panel windows with different categories.

Just click on System option, a small System Properties dialog box will appear with many options like System Restore, Remote and Automatic Updates and others.

Click on Automatic Updates tab, if it is not selected already then click on “Automatic (recommended)” box. Then this will display the different setting to continually check Microsoft’s website for updates.

Here you can pick a download and installation schedule or select the option “Download the updates automatically and notify me when they are ready to be installed” in the section of settings. Through this option you can download updates automatically and it will install the updates immediately.
If you wait a day or two before installing an updates to make sure there are not any serious bugs reported about the latest patch you can check it through Microsoft website. Now click on Ok button to finish the process.

Today tip will help you to enjoy the quick and easy way to find lost files on your computer. Here I recommends you, try to search a file with its file extensions (for example for word file, type *.doc, Excel *.xls, Acrobat *.pdf, *.ppt and *.exe for executable files. If you don't know the name of file but know that it contains a string of text then try to search for files containing specific text, type the text you want to find from any file or folder. This is time taking process but creates very precise result. In Look in, click the drive, folder, or network you want to search. To save time, always select the specified drive or location instead of whole computer.

Click Start Button, point to Search, and then click For File or Folders, a Search Results dialog box will appear. In Search for files or folders named, type the file name or folder name you want to find in containing text.
To specify additional search criteria, click Search Options, and then click one or more of the following options to narrow your search:
- Select Date to look for files that were created or modified on or between specific dates.
- Select Type to look for files of a specific type, such as a text or WordPad document.
- Select Size to look for files of a specific size.
- Select Advanced Options to specify additional search criteria.
- Click Search now.

Trick to Stop or Disable the Ads in Youtube While Playing an Video.
It's Impossible to Stop the Ads in Youtube but You can Try the Alternate Method to Watch Videos without Ads and Enjoying the Online Video Sessions. A Firefox extension TubeStop was created to keep YouTube videos from automatically playing on the video-sharing site. A great side effect of TubeStop has been the removal of the new ads on YouTube clips.
How this will work : TubeStop replaces YouTube’s native player on the site with the embeddable version, which has not been ad-ified yet. So get the TubeStop extension now, and you’ll be prepared for when Google starts rolling ads on YouTube again.

Too many Failed files, playing will stop now Error Resolved Solution
The Reasons Would Be :
- more than 5-10 files in a row can't be played.
- no such files actually exist on sd card (files or folder were moved somewhere else, deleted outside of Poweramp, etc.). Folders Rescan will fix that
- sd card is unmounted (e.g. phone is connected as usb storage)
- given files are not in Poweramp supported format
- files can't be read (sd card is broken, files were not downloaded completely, etc.)
Actually My Mobile had 4th Issue (given files are not in Poweramp supported format). After I Checked in My End I had Some Files and Images in MusicFolders.
Issue will be Resolved When Users of PowerAMP Must Ensure that There Should not be Any Other Formats Files Except MP3 Files.

Some times Some websites banned by Government, ISP and may be by your office network administrator.
This Tricks are very useful, if you are using internet particularly in school, college and office.
Follow any of the Below Tricks to Enable or to Access the Websites :
Trick 1: Search the banned website, for example www.example.com in Google and yahoo search engine then open the cached copy of that page to access the website. You can get also cache link of that website, if you search in Google with keyword cache:URL name and get cache link to access the website.
Trick 2: Another method to access the banned website using its IP address, because you can open the website with IP address instead of actual URL name. This Trick bypasses the URL based restrictions. For example if www.example.com is banned in your school, you can open it using IP address 216.178.32.51. You can search online IP conversion tools to get IP address of any website.
Trick 3: There are some mini web browsers can help you to open the banned websites, for example Opera Mini Browser, install it and try to open any banned website. Another Real Player browser can successfully help you to access the banned website. This Real Player browser bypasses the many restrictions of website banned tools.
Trick 4: There any many websites Anonymizer tools are available to fetch the banned website. These anonymous surfing tools that protect your identity on the internet and give the access to banned sites. As far as the service provider is concerned you are viewing a page from Anonymizer and not the blocked site.

Now You can insert the YouTube Videos into your PowerPoint slides to express your idea or better way to communicate something. You can convey these ideas in more effective ways, if you are using movie files with your simple slides.
Follow the given steps to add YouTube Videos into your PowerPoint slides:
First of all download the YouTube.com Videos and then save on your computer hard drive. Mostly movies are available in flash video file format on YouTube site.
You can convert also the downloaded Videos from YouTube into any common format, for example, windows media video file (wmv), windows video file (avi) and movie file (mpeg).
Tip : You can Use the KeepVid Program to Download the Youtube Videos.
First of all open the presentation in which you want to insert movie file.
Now click on "Movies and Sounds" option from the Insert" menu and choose the option "Movie from File".

Now select your movie that you want to insert into slide and click on Ok button.

Here now you are asked "Do you want your movie to play automatically in the slide show? If not, it will play when you click it."

Recommend choosing Ok button to play automatically even if you want the movie to play when clicked.
Finally save your PowerPoint presentation and run it for test.
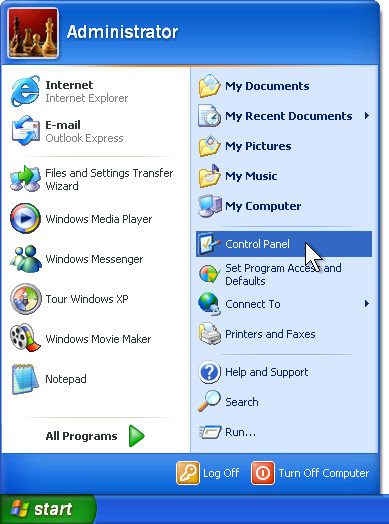
Usually Sometimes You will be Unable to Open the Control Panel if the Virus Security blocks the Registry.
The Below Post may be Useful to you to Enable it 2nd Time in System.
Different antivirus and firewall programs are used to manage the security of the computer. Some times this is build-in antivirus or firewall program in windows XP to maintain the computer security.
But if your windows is not provided with any antivirus, firewall program and Automatic Updates, your windows security center will alerts you a message "Your computer may be at risk. Your virus protection status is unknown" with useless repeating reminder.
You can disable this message permanently by changing the values of “AntiVirusDisableNotify” in windows registry.
Follow the given steps to edit the computer registry for disable message:
- First click on Start button then type Regedit in Run option.
- Here locate the location to: · HKEY_LOCAL_MACHINE\SOFTWARE\Microsoft\Security Center
- Here in right side panel, double click on AntiVirusDisableNotify and set its value 1.
- Finally Close All Programs and Re-Start Your System to Check the Effects.
Usually PC Users will end the Running tasks the Un-Responsive programs manually using windows Task Manager with (CTRL + ALT +DELETE) keys.
Sometimes these non-responsive programs creates problem to run windows and others programs properly.
You can configure your computer to manage these non-responsive programs automatically.
Windows has a feature that will close all non responding program automatically.
If you have little knowledge about editing windows registry then you can configure your computer for this purpose.
Follow the given steps to configure windows registry for auto end task:
First click on Start button then type Regedit in Run option. Here locate the location to:
Go to Hkey_Current_User\Control Panel\Desktop
Here in right side panel, double click on AutoEndTasks and here its default value is 0. Now change it to 1. Now windows will close your all non-responsive programs automatically.
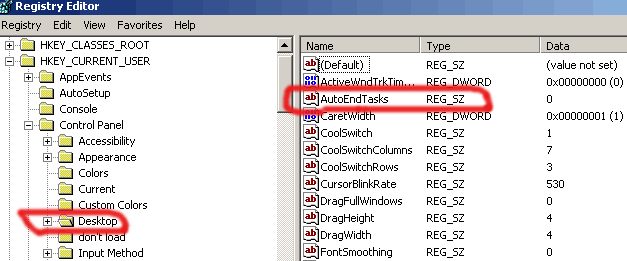
Finally Now Close All Running Programs in Your System and Re-Start Your System Once to See the Changes that you have Made.

Usually When you are working on your local computer and want to refresh any changes in your system automatically.
For example some times you are watching sports results, online Stock Exchange rates and any changes to your hard drive but these changes are not usually refreshed until you press the F5 key on your keyboard.
To refresh your screen automatically you should edit your system Registry.
But the best technique to edit the windows registry keys, always export or backup the whole windows registry keys on backup drive before editing.
Because if you do any mistake in Registry can cause serious problem in your computer to run properly.
Follow the below given steps to change the updates automatically.
- First click on Start button then type Regedit in Run option.
- In Registry Editor panel go to the path: HKEY_LOCAL_MACHINE / System / CurrentControlSet / Control / Update Mode
- Here in right hand side panel edit the DWORD value to be between 1 and 5.
- Now restart your computer after any changes to go into effect.

Microsoft Outlook enables you to filter and organize e-mail messages, integrate and manage e-mail from multiple e-mail accounts, personal and group calendars, contacts, folders, and tasks.
Outlook data is usually stored at the following paths be defaults but you can change Outlook location.
Normally Outlook folder location is C:\ drive when you install your window on C drive, but you can change location of you Outlook to other Drive.
- C:\Documents and Settings\User Name\Application Data\Microsoft\Outlook\
- C:\Documents and Settings\User Name\Local Settings\Application Data\Microsoft\Outlook\
- C:\Documents and Settings\All Users\Application Data\Microsoft\Outlook\
- C:\Windows\Application Data\Microsoft\Outlook\
- C:\Windows\
Usually Using Import and Export feature in Outlook, you can create the full backup of outlook contacts. Because without backup yon can lose your e-mail accounts data any time due to virus, power failure and hard disk problem.
Follow the given steps to export your outlook contacts to Excel file:
Click on Start button, go to Program then click on Microsoft Outlook to export the contacts.
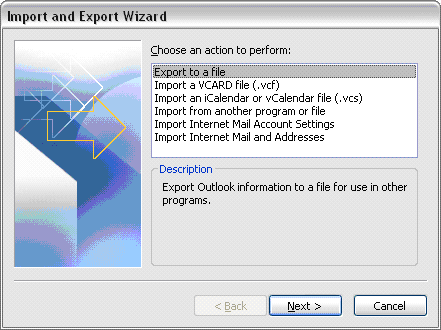
Now go to File menu and click on Import and Export option. Choose Export to a file as show in the below figure then click Next.
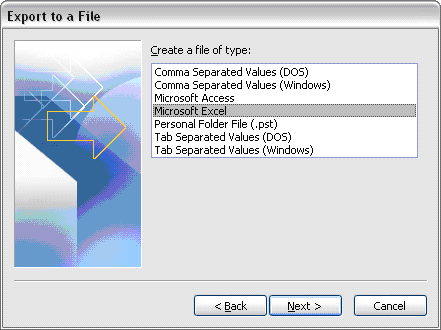
Now on next dialog box, choose Microsoft Excel and click Next.
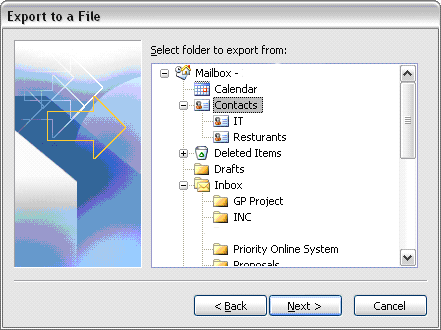
Select the Contacts Folder you want to backup to Excel file as shown below then click Next.
Choose a name and location where to save the Excel file by clicking Browse button, then click Next.
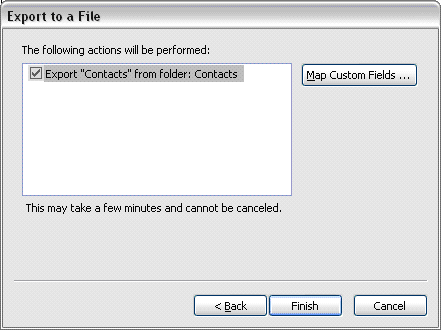
Click Finish to start the back up procedure which may take little time depending on how many contacts you have.