
It is very easy and interesting to change the name of Recycle Bin of your system.
Follow these Below Steps to do it:
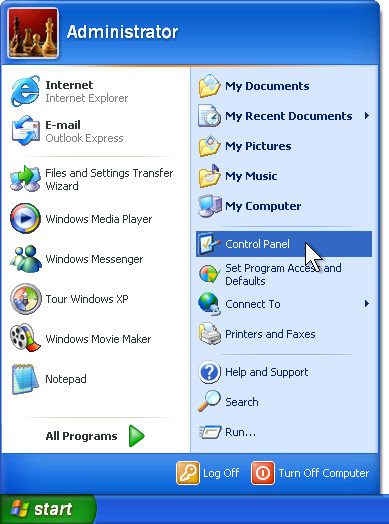
- First click on Start button > click on Run option.
- Type here regedit.exe and press enter then you will find there regedit editor.
- In regedit editor you will open HKEY_CLASSES_ROOT folder, In this folder open the CLSID folder then open the {645FF040-5081-101B-9F08-00AA002F954E} folder >ShellFolder folder at last.
- Here simply change the data value from "40 01 00 20" to "70 01 00 20".

Laptop manufactures gives you the guarantee about the battery that how long it works. The battery of laptop always stops working very early at some stage in essential research, just like when you are watching a DVD movie.
Follow the few steps to increase the laptop battery's life: Lower the backlighting on your screen.
The screen of your Laptop takes up significant amount of power and you do not require its maximum brightness. You should have to check your system and decrease the screen brightness it to a comfortable point.
Stop your wireless signal when you are not using.
After turning off your Laptop can save max. 20 minutes of your laptop's battery time because WiFi can use a considerable quantity of power. By right clicking you can stop your WiFi signal when you are not using.

Manage the correct power scheme in XP
Windows XP contain a number of predetermined power plans, which control settings like how rapidly your laptop turns off and when your screen saver boots in. You can change your laptop power scheme by choosing Control Panel > Power Options. For max. Battery life from the "Power scheme" chooses the option "Max. Battery" and decline the list. There are good choices for you just like "Low Power Mode" and Portable /Laptop. They don't conserve as much power as Max Battery. After selecting a power scheme you click Ok button to finish the process.


You can enable this option to run windows update automatically when your computer will be connected to the internet. Through this service you can check the Microsoft website for downloadable improvements to the operating system and security patches also. These latest updates will protect your computer from the attacks of latest viruses and potential hackers. Windows Update is free of cost and important service that is why always makes sure its running on your computer.
Follow the given steps to enable this important feature on your computer:
To use this feature, you will need to be logged into your computer with administrative rights.
Click Start button and go to Settings then click on Control Panel option. Now system will open the Control Panel windows with different categories.

Just click on System option, a small System Properties dialog box will appear with many options like System Restore, Remote and Automatic Updates and others.

Click on Automatic Updates tab, if it is not selected already then click on “Automatic (recommended)” box. Then this will display the different setting to continually check Microsoft’s website for updates.

Here you can pick a download and installation schedule or select the option “Download the updates automatically and notify me when they are ready to be installed” in the section of settings. Through this option you can download updates automatically and it will install the updates immediately.
If you wait a day or two before installing an updates to make sure there are not any serious bugs reported about the latest patch you can check it through Microsoft website. Now click on Ok button to finish the process.

Today tip will help you to enjoy the quick and easy way to find lost files on your computer. Here I recommends you, try to search a file with its file extensions (for example for word file, type *.doc, Excel *.xls, Acrobat *.pdf, *.ppt and *.exe for executable files. If you don't know the name of file but know that it contains a string of text then try to search for files containing specific text, type the text you want to find from any file or folder. This is time taking process but creates very precise result. In Look in, click the drive, folder, or network you want to search. To save time, always select the specified drive or location instead of whole computer.

Click Start Button, point to Search, and then click For File or Folders, a Search Results dialog box will appear. In Search for files or folders named, type the file name or folder name you want to find in containing text.
To specify additional search criteria, click Search Options, and then click one or more of the following options to narrow your search:
- Select Date to look for files that were created or modified on or between specific dates.
- Select Type to look for files of a specific type, such as a text or WordPad document.
- Select Size to look for files of a specific size.
- Select Advanced Options to specify additional search criteria.
- Click Search now.


Google Search Launches It's New Scientific Calculator in the Search Results. Before today, when you typed an equation into Google - say, "15 x 7" — the answer (105) would appear in bold above you actual search results.
Now Google has gone one step further, giving you your answer on a virtual calculator. The blue-hued calculator appears above your results, as before, and has 34 buttons, including standard trigonometric functions, exponents and buttons for the transcendental numbers, pi and e. It also works on mobile. In Mashable Team's quick test, it appeared in both Safari and Chrome on iOS and of course on Android as well. Although the scientific functions aren’t visible in portrait mode, they appear when you flip your phone to landscape - a trick Google’s borrowing from the iOS-standard calculator.
Punching buttons is a little unwieldy in the desktop browser, but it’s natural as can be on a phone. Plus, on both versions, you can do calculations via voice search. The voice interface can even discern such phrasing as “cosine of 60 degrees.”
Source : Mashable


Bigrock Discount Coupons High Range 50%off
BigRock Announces It's Ever Before Discount Offer Valid for Limited Period for those Who want to Make a New Own Website with Unlimited Features. Now Get Flat 40% off on Web Hosting! Not applicable on Email and Reseller hosting Only on Bigrock. Use the Coupon Code BIGWEB40 While Purchasing Your Webhosting Plans in Bigrock.

Trick to Stop or Disable the Ads in Youtube While Playing an Video.
It's Impossible to Stop the Ads in Youtube but You can Try the Alternate Method to Watch Videos without Ads and Enjoying the Online Video Sessions. A Firefox extension TubeStop was created to keep YouTube videos from automatically playing on the video-sharing site. A great side effect of TubeStop has been the removal of the new ads on YouTube clips.
How this will work : TubeStop replaces YouTube’s native player on the site with the embeddable version, which has not been ad-ified yet. So get the TubeStop extension now, and you’ll be prepared for when Google starts rolling ads on YouTube again.

Too many Failed files, playing will stop now Error Resolved Solution
The Reasons Would Be :
- more than 5-10 files in a row can't be played.
- no such files actually exist on sd card (files or folder were moved somewhere else, deleted outside of Poweramp, etc.). Folders Rescan will fix that
- sd card is unmounted (e.g. phone is connected as usb storage)
- given files are not in Poweramp supported format
- files can't be read (sd card is broken, files were not downloaded completely, etc.)
Actually My Mobile had 4th Issue (given files are not in Poweramp supported format). After I Checked in My End I had Some Files and Images in MusicFolders.
Issue will be Resolved When Users of PowerAMP Must Ensure that There Should not be Any Other Formats Files Except MP3 Files.

It's Windows reimagined and reinvented from a solid core of Windows 7 speed and reliability. It's an all-new touch interface. It's a new Windows for new devices. And it's easy to try now—whether you're installing it for the first time, or moving from Windows 8 Consumer Preview.
I Have Tried The Preview Version and it's Simply Cool and didn't Expected Windows Will Come with like this Experiment. Have a Look at Official Website of Windows 8 and Try it Now.
Click Here to Visit and Download from Windows 8 Website.

Some times Some websites banned by Government, ISP and may be by your office network administrator.
This Tricks are very useful, if you are using internet particularly in school, college and office.
Follow any of the Below Tricks to Enable or to Access the Websites :
Trick 1: Search the banned website, for example www.example.com in Google and yahoo search engine then open the cached copy of that page to access the website. You can get also cache link of that website, if you search in Google with keyword cache:URL name and get cache link to access the website.
Trick 2: Another method to access the banned website using its IP address, because you can open the website with IP address instead of actual URL name. This Trick bypasses the URL based restrictions. For example if www.example.com is banned in your school, you can open it using IP address 216.178.32.51. You can search online IP conversion tools to get IP address of any website.
Trick 3: There are some mini web browsers can help you to open the banned websites, for example Opera Mini Browser, install it and try to open any banned website. Another Real Player browser can successfully help you to access the banned website. This Real Player browser bypasses the many restrictions of website banned tools.
Trick 4: There any many websites Anonymizer tools are available to fetch the banned website. These anonymous surfing tools that protect your identity on the internet and give the access to banned sites. As far as the service provider is concerned you are viewing a page from Anonymizer and not the blocked site.

Now You can insert the YouTube Videos into your PowerPoint slides to express your idea or better way to communicate something. You can convey these ideas in more effective ways, if you are using movie files with your simple slides.
Follow the given steps to add YouTube Videos into your PowerPoint slides:
First of all download the YouTube.com Videos and then save on your computer hard drive. Mostly movies are available in flash video file format on YouTube site.
You can convert also the downloaded Videos from YouTube into any common format, for example, windows media video file (wmv), windows video file (avi) and movie file (mpeg).
Tip : You can Use the KeepVid Program to Download the Youtube Videos.
First of all open the presentation in which you want to insert movie file.
Now click on "Movies and Sounds" option from the Insert" menu and choose the option "Movie from File".

Now select your movie that you want to insert into slide and click on Ok button.

Here now you are asked "Do you want your movie to play automatically in the slide show? If not, it will play when you click it."

Recommend choosing Ok button to play automatically even if you want the movie to play when clicked.
Finally save your PowerPoint presentation and run it for test.
Usually Sometimes You will be Unable to Open the Control Panel if the Virus Security blocks the Registry.
The Below Post may be Useful to you to Enable it 2nd Time in System.
Different antivirus and firewall programs are used to manage the security of the computer. Some times this is build-in antivirus or firewall program in windows XP to maintain the computer security.
But if your windows is not provided with any antivirus, firewall program and Automatic Updates, your windows security center will alerts you a message "Your computer may be at risk. Your virus protection status is unknown" with useless repeating reminder.
You can disable this message permanently by changing the values of “AntiVirusDisableNotify” in windows registry.
Follow the given steps to edit the computer registry for disable message:
- First click on Start button then type Regedit in Run option.
- Here locate the location to: · HKEY_LOCAL_MACHINE\SOFTWARE\Microsoft\Security Center
- Here in right side panel, double click on AntiVirusDisableNotify and set its value 1.
- Finally Close All Programs and Re-Start Your System to Check the Effects.

Usually PC Users will end the Running tasks the Un-Responsive programs manually using windows Task Manager with (CTRL + ALT +DELETE) keys.
Sometimes these non-responsive programs creates problem to run windows and others programs properly.
You can configure your computer to manage these non-responsive programs automatically.
Windows has a feature that will close all non responding program automatically.
If you have little knowledge about editing windows registry then you can configure your computer for this purpose.
Follow the given steps to configure windows registry for auto end task:
First click on Start button then type Regedit in Run option. Here locate the location to:
Go to Hkey_Current_User\Control Panel\Desktop
Here in right side panel, double click on AutoEndTasks and here its default value is 0. Now change it to 1. Now windows will close your all non-responsive programs automatically.
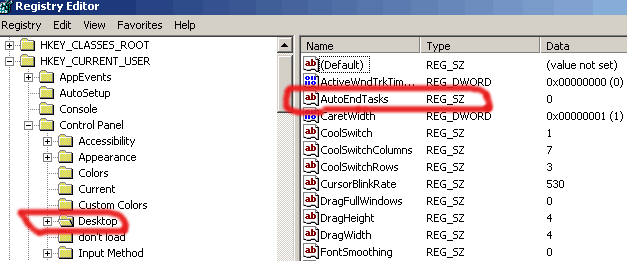
Finally Now Close All Running Programs in Your System and Re-Start Your System Once to See the Changes that you have Made.

Usually When you are working on your local computer and want to refresh any changes in your system automatically.
For example some times you are watching sports results, online Stock Exchange rates and any changes to your hard drive but these changes are not usually refreshed until you press the F5 key on your keyboard.
To refresh your screen automatically you should edit your system Registry.
But the best technique to edit the windows registry keys, always export or backup the whole windows registry keys on backup drive before editing.
Because if you do any mistake in Registry can cause serious problem in your computer to run properly.
Follow the below given steps to change the updates automatically.
- First click on Start button then type Regedit in Run option.
- In Registry Editor panel go to the path: HKEY_LOCAL_MACHINE / System / CurrentControlSet / Control / Update Mode
- Here in right hand side panel edit the DWORD value to be between 1 and 5.
- Now restart your computer after any changes to go into effect.

Microsoft Outlook enables you to filter and organize e-mail messages, integrate and manage e-mail from multiple e-mail accounts, personal and group calendars, contacts, folders, and tasks.
Outlook data is usually stored at the following paths be defaults but you can change Outlook location.
Normally Outlook folder location is C:\ drive when you install your window on C drive, but you can change location of you Outlook to other Drive.
- C:\Documents and Settings\User Name\Application Data\Microsoft\Outlook\
- C:\Documents and Settings\User Name\Local Settings\Application Data\Microsoft\Outlook\
- C:\Documents and Settings\All Users\Application Data\Microsoft\Outlook\
- C:\Windows\Application Data\Microsoft\Outlook\
- C:\Windows\
Usually Using Import and Export feature in Outlook, you can create the full backup of outlook contacts. Because without backup yon can lose your e-mail accounts data any time due to virus, power failure and hard disk problem.
Follow the given steps to export your outlook contacts to Excel file:
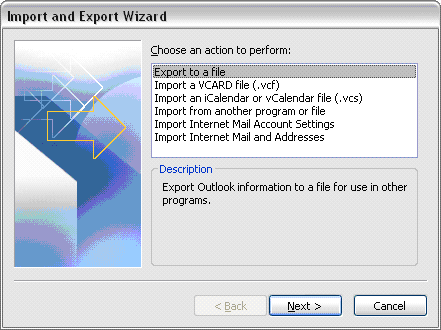
Click on Start button, go to Program then click on Microsoft Outlook to export the contacts.
Now go to File menu and click on Import and Export option. Choose Export to a file as show in the below figure then click Next.
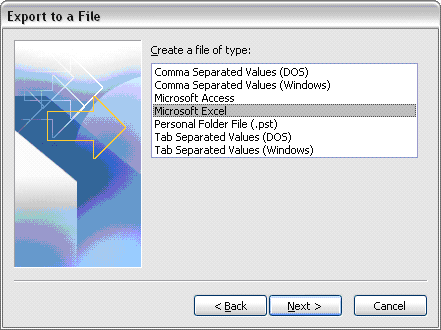
Now on next dialog box, choose Microsoft Excel and click Next.
Select the Contacts Folder you want to backup to Excel file as shown below then click Next.

Choose a name and location where to save the Excel file by clicking Browse button, then click Next.
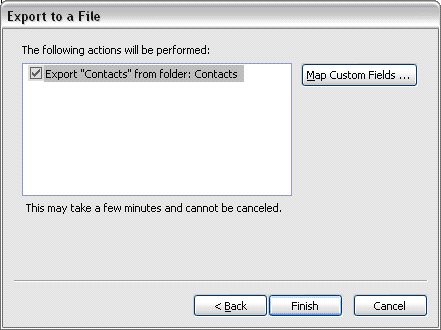
Click Finish to start the back up procedure which may take little time depending on how many contacts you have.